Introduction to Homemade Peanut Butter Cup Ice Cream
Ice cream is a beloved treat enjoyed by many, especially during the warm summer months. Among the countless flavors available, peanut butter cup ice cream stands out as a favorite for its rich, creamy texture and delightful combination of chocolate and peanut butter. Making your own ice cream at home not only allows you to customize flavors but also ensures that you know exactly what goes into your dessert. This Homemade Peanut Butter Cup Ice Cream recipe is a perfect way to indulge your sweet tooth while enjoying the satisfaction of creating something delicious from scratch.
Why You Should Make Homemade Ice Cream
There are several reasons to whip up a batch of homemade ice cream. First, it’s incredibly fun! The process of mixing ingredients and watching them transform into a creamy treat is rewarding. Plus, you can experiment with flavors and textures that store-bought options may not offer. For instance, you can add as many peanut butter cups as you like, making each scoop a delightful surprise.
Another reason to make homemade ice cream is the quality of ingredients. When you prepare it yourself, you can choose fresh, high-quality components. This means no artificial flavors or preservatives, just pure, delicious goodness. Additionally, homemade ice cream can be tailored to fit dietary needs. Whether you prefer it dairy-free or want to reduce sugar, the choice is yours!
Lastly, homemade ice cream is perfect for gatherings. Impress your friends and family with a unique dessert that they can’t find in stores. It’s a great conversation starter and a delightful way to cool off on a hot day. So, gather your ingredients and get ready to create a creamy masterpiece that will leave everyone asking for seconds!
Ingredients for Homemade Peanut Butter Cup Ice Cream
To create your own delicious Homemade Peanut Butter Cup Ice Cream, you’ll need a few simple ingredients. Each component plays a vital role in achieving that creamy texture and rich flavor. Here’s what you’ll need:
- 2 cups heavy cream: This is the base of your ice cream, providing a rich and creamy texture.
- 1 cup whole milk: Whole milk adds creaminess and balances the richness of the heavy cream.
- 3/4 cup granulated sugar: Sugar sweetens the ice cream and helps create a smooth texture.
- 1 teaspoon vanilla extract: Vanilla enhances the overall flavor, making it more delightful.
- 1 cup peanut butter: Use creamy or crunchy peanut butter for that delicious peanut flavor.
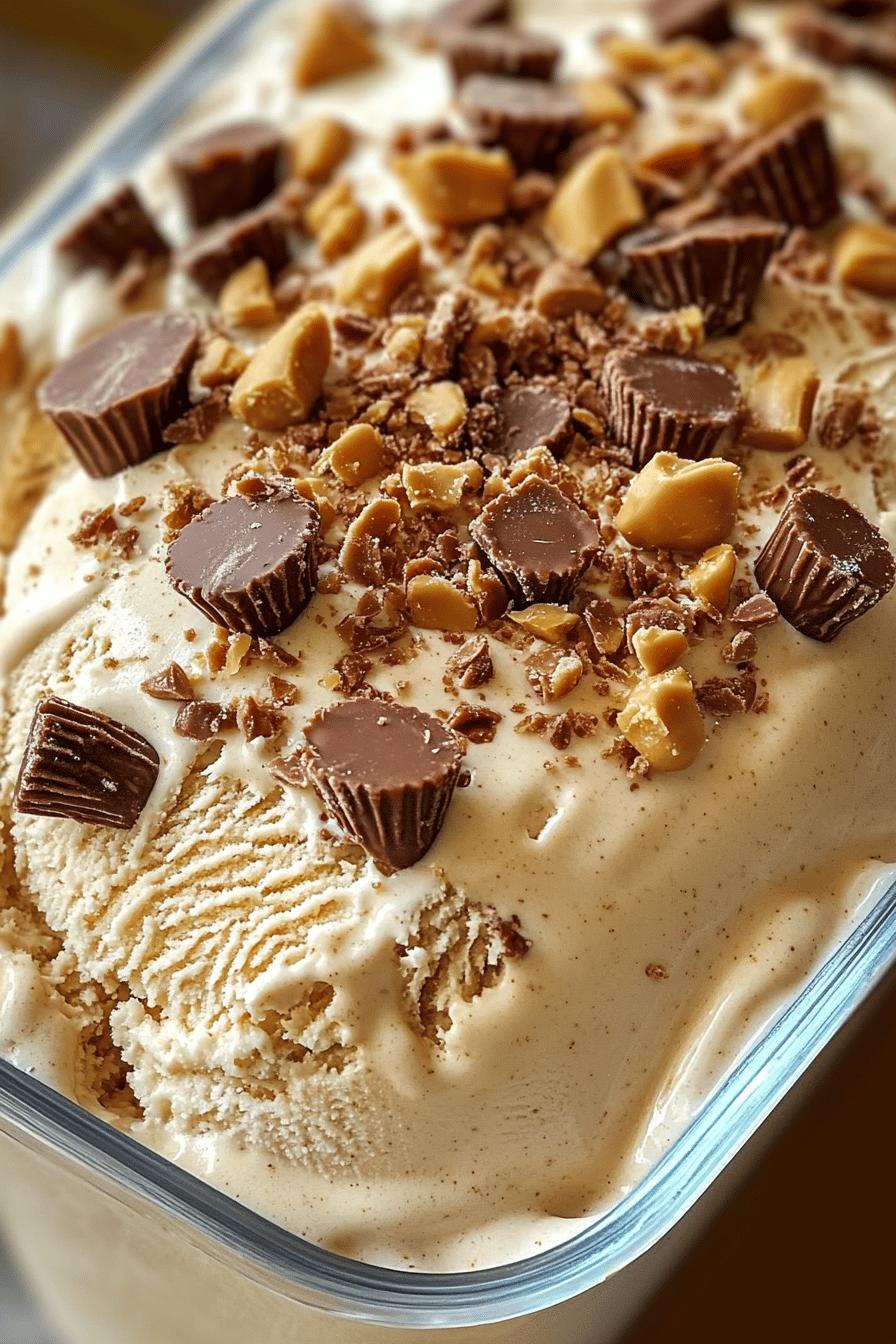
- 1 cup chopped peanut butter cups: These add chunks of chocolate and peanut butter, making each bite a treat!
Feel free to adjust the amount of peanut butter cups based on your preference. If you love a lot of chocolate and peanut butter, go ahead and add more! This recipe is all about making it your own. Now that you have your ingredients ready, let’s move on to the next step of preparing this delightful ice cream.
Step-by-Step Preparation of Homemade Peanut Butter Cup Ice Cream
Now that you have all your ingredients ready, it’s time to dive into the fun part—making your Homemade Peanut Butter Cup Ice Cream! Follow these simple steps to create a creamy, dreamy dessert that will have everyone coming back for more.
Step 1: Gather Your Ingredients
Before you start, make sure you have everything you need. Gather your heavy cream, whole milk, granulated sugar, vanilla extract, peanut butter, and chopped peanut butter cups. Having everything in one place will make the process smoother and more enjoyable. Plus, it’s always nice to see all the delicious ingredients lined up, ready to be transformed into a tasty treat!
Step 2: Mix the Base
In a large mixing bowl, combine the heavy cream, whole milk, and granulated sugar. Use a whisk to mix these ingredients together until the sugar is fully dissolved. This step is crucial because it ensures that your ice cream will be smooth and creamy. The mixture should be well-blended and slightly frothy. Don’t rush this part; take your time to get it just right!
Step 3: Incorporate the Peanut Butter
Next, it’s time to add the star of the show—peanut butter! Spoon in the peanut butter and continue to whisk until it’s fully incorporated into the mixture. You want to achieve a smooth consistency, so make sure there are no lumps. The peanut butter will add a rich flavor that pairs perfectly with the creaminess of the base. If you prefer a stronger peanut flavor, feel free to add a bit more peanut butter!
Step 4: Add the Chunks of Peanut Butter Cups
Now comes the fun part! Gently fold in the chopped peanut butter cups. This will give your ice cream those delightful chunks of chocolate and peanut butter that everyone loves. Use a spatula to mix them in carefully, ensuring they are evenly distributed throughout the mixture. The more chunks, the better! You want every scoop to be a surprise.
Step 5: Churn the Ice Cream
Once your mixture is ready, it’s time to churn! Pour the mixture into your ice cream maker and follow the manufacturer’s instructions. Churning incorporates air into the ice cream, making it light and fluffy. This process usually takes about 20 to 30 minutes. Keep an eye on it, and you’ll know it’s ready when it reaches a soft-serve consistency.
Step 6: Freeze the Ice Cream
After churning, transfer the ice cream to an airtight container. Smooth the top with a spatula and cover it tightly. Place the container in the freezer for at least 4 hours, or until it’s firm. This step is essential for achieving that perfect scoopable texture. Once it’s frozen, you’ll be ready to enjoy your Homemade Peanut Butter Cup Ice Cream!
And there you have it! A simple, step-by-step guide to making your own delicious ice cream at home. Now, let’s explore some variations you can try to make this recipe even more exciting!
Variations of Homemade Peanut Butter Cup Ice Cream
While the classic Homemade Peanut Butter Cup Ice Cream is already a delightful treat, there are many ways to mix things up! By adding different ingredients or making simple substitutions, you can create a variety of flavors that will keep your taste buds excited. Let’s explore some alternative mix-ins and dairy-free options that you can try.
Alternative Mix-Ins
Get creative with your ice cream by adding different mix-ins! Here are some fun ideas:
- Chocolate Chips: Add semi-sweet or dark chocolate chips for an extra chocolatey experience.
- Crushed Cookies: Mix in crushed chocolate sandwich cookies or graham crackers for a crunchy texture.
- Caramel Swirls: Drizzle in some caramel sauce before freezing for a sweet surprise in every scoop.
- Chopped Nuts: Add chopped peanuts or almonds for a nutty crunch that complements the peanut butter flavor.
- Marshmallows: Mini marshmallows can add a fun, chewy texture to your ice cream.
Feel free to experiment with these mix-ins or come up with your own combinations. The possibilities are endless, and you can tailor your ice cream to suit your personal taste!
Dairy-Free Options
If you’re looking for a dairy-free version of this delicious ice cream, you’re in luck! Here’s how to make it without dairy:
- Coconut Milk: Substitute heavy cream and whole milk with full-fat coconut milk. This will give your ice cream a rich and creamy texture.
- Nut Milk: Almond milk or cashew milk can also work well. Just make sure to choose unsweetened varieties to control the sweetness.
- Dairy-Free Peanut Butter: Use a dairy-free peanut butter to ensure that all ingredients are free from dairy.
- Maple Syrup: Instead of granulated sugar, try using maple syrup for a natural sweetener that adds a unique flavor.
With these simple swaps, you can enjoy a creamy and delicious dairy-free Homemade Peanut Butter Cup Ice Cream that everyone can savor!
Cooking Note for Homemade Peanut Butter Cup Ice Cream
When making your Homemade Peanut Butter Cup Ice Cream, there are a few important cooking notes to keep in mind. These tips will help ensure that your ice cream turns out perfectly creamy and delicious every time.
First, always use high-quality ingredients. The flavor of your ice cream largely depends on the quality of the heavy cream, milk, and peanut butter you choose. Opt for natural peanut butter without added sugars or oils for the best taste. This will enhance the overall flavor of your ice cream.
Next, make sure to chill your mixing bowl and ice cream maker bowl before starting. This helps the mixture freeze faster, resulting in a smoother texture. You can place them in the freezer for about 30 minutes before you begin mixing.
Additionally, be patient during the churning process. Churning incorporates air into the mixture, which is essential for achieving that light and fluffy texture. If you stop too early, your ice cream may end up dense and icy. Keep an eye on it, and let it churn until it reaches a soft-serve consistency.
Lastly, remember that homemade ice cream can be softer than store-bought varieties. This is because it lacks the stabilizers and preservatives found in commercial ice creams. If you prefer a firmer texture, allow your ice cream to freeze for a longer period after churning. Just be sure to let it sit at room temperature for a few minutes before scooping, as this will make serving easier.
By following these cooking notes, you’ll be well on your way to creating a delightful Homemade Peanut Butter Cup Ice Cream that everyone will love!
Serving Suggestions for Homemade Peanut Butter Cup Ice Cream
Once your Homemade Peanut Butter Cup Ice Cream is ready, it’s time to serve it up! This creamy dessert is delicious on its own, but you can elevate it even further with some tasty toppings. Here are some delightful serving suggestions to enhance your ice cream experience:
Toppings to Enhance Your Ice Cream
Adding toppings can take your ice cream to the next level. Here are some scrumptious ideas:
- Chocolate Sauce: Drizzle warm chocolate sauce over your ice cream for an extra layer of sweetness. The combination of chocolate and peanut butter is always a hit!
- Whipped Cream: A dollop of whipped cream adds a light and fluffy texture that pairs perfectly with the rich ice cream.
- Chopped Nuts: Sprinkle some chopped peanuts or walnuts on top for a crunchy contrast to the creamy ice cream.
- Caramel Sauce: A drizzle of caramel sauce can add a sweet, buttery flavor that complements the peanut butter beautifully.
- Fresh Fruit: Sliced bananas or strawberries can add a refreshing touch and a pop of color to your dessert.
- Mini Marshmallows: For a fun twist, add mini marshmallows for a chewy texture that kids will love!
Feel free to mix and match these toppings to create your perfect bowl of ice cream. You can even set up a topping bar for parties, allowing guests to customize their own sundaes. This way, everyone can enjoy their ice cream just the way they like it!
With these serving suggestions, your Homemade Peanut Butter Cup Ice Cream will be a showstopper at any gathering. So scoop it up, add your favorite toppings, and enjoy a delightful treat that’s sure to impress!
Tips for Perfect Homemade Peanut Butter Cup Ice Cream
Creating the perfect Homemade Peanut Butter Cup Ice Cream is all about attention to detail. With a few helpful tips, you can ensure that your ice cream turns out creamy, flavorful, and absolutely delicious. Here are some essential tips to keep in mind:
- Use Cold Ingredients: Start with cold heavy cream and milk. This helps the mixture freeze faster, resulting in a smoother texture. If possible, chill your mixing bowl and ice cream maker bowl in the freezer for about 30 minutes before you begin.
- Don’t Overmix: When incorporating the peanut butter and mix-ins, be careful not to overmix. Gently fold in the ingredients to maintain the airiness of the mixture. This will help keep your ice cream light and fluffy.
- Churn Until Soft-Serve Consistency: Pay close attention during the churning process. Stop when the ice cream reaches a soft-serve consistency. If you churn too long, it may become too hard and icy.
- Freeze in Small Batches: If you have a large batch, consider freezing it in smaller containers. This allows for quicker freezing and helps maintain the texture. Plus, it’s easier to scoop out smaller amounts!
- Let It Sit Before Scooping: After freezing, let your ice cream sit at room temperature for about 5-10 minutes before scooping. This will soften it slightly, making it easier to serve.
- Experiment with Flavors: Don’t hesitate to try different flavors of peanut butter or add other ingredients. For example, using chocolate peanut butter can add a new twist to your ice cream.
- Store Properly: To keep your ice cream fresh, store it in an airtight container. Press a piece of plastic wrap directly onto the surface of the ice cream before sealing the container. This helps prevent ice crystals from forming.
By following these tips, you’ll be well on your way to making the best Homemade Peanut Butter Cup Ice Cream. Enjoy the process, and don’t forget to share your delicious creation with family and friends!
Breakdown of Time for Homemade Peanut Butter Cup Ice Cream
Understanding the time required to make your Homemade Peanut Butter Cup Ice Cream can help you plan better. Here’s a simple breakdown of the time you’ll need for each step of the process. This way, you can enjoy your delicious treat without any surprises!
Prep Time
The prep time for this delightful ice cream is approximately 15 to 20 minutes. This includes gathering your ingredients, mixing the base, and incorporating the peanut butter and chunks of peanut butter cups. Make sure to take your time during this step to ensure everything is well combined. A little extra care now will lead to a creamier ice cream later!
Cooking Time
Cooking time, or rather churning time, typically takes about 20 to 30 minutes. This is when your mixture transforms into a soft-serve consistency. Keep an eye on it as it churns, and stop when it reaches that perfect texture. Remember, the longer you churn, the fluffier your ice cream will be!
Total Time
In total, you should expect to spend around 4 to 5 hours to enjoy your Homemade Peanut Butter Cup Ice Cream. This includes the prep time, churning time, and the freezing time of at least 4 hours. While it may seem like a long wait, the end result is well worth it! You’ll have a creamy, delicious treat that’s perfect for any occasion.
So, gather your ingredients, set aside some time, and get ready to indulge in a delightful homemade dessert that everyone will love!
Nutritional Information for Homemade Peanut Butter Cup Ice Cream
Understanding the nutritional content of your Homemade Peanut Butter Cup Ice Cream can help you enjoy it even more. While this dessert is a delightful treat, it’s always good to know what you’re indulging in. Below is a breakdown of the key nutritional information for a standard serving of this creamy ice cream.
Calories
One serving of Homemade Peanut Butter Cup Ice Cream (approximately 1/2 cup) contains around 300 to 350 calories. This number can vary based on the specific ingredients you use, such as the type of peanut butter or the amount of sugar. While it’s a rich dessert, it’s perfect for an occasional treat!
Protein
This ice cream is not only delicious but also provides a decent amount of protein. Each serving contains about 6 to 8 grams of protein, thanks to the heavy cream, whole milk, and peanut butter. Protein is essential for muscle repair and growth, making this dessert a bit more satisfying.
Sodium
In terms of sodium, a serving of Homemade Peanut Butter Cup Ice Cream typically has around 100 to 150 milligrams. This is relatively low, especially considering that many store-bought ice creams can have higher sodium levels due to added preservatives. Keeping sodium in check is important for overall health, so this homemade version is a great choice!
By being aware of the nutritional information, you can enjoy your Homemade Peanut Butter Cup Ice Cream guilt-free. Remember, moderation is key, and this creamy delight can be a wonderful addition to your dessert repertoire!
FAQs About Homemade Peanut Butter Cup Ice Cream
Can I use natural peanut butter in this recipe?
Yes, you can use natural peanut butter in this recipe! However, keep in mind that natural peanut butter tends to be less sweet and may have a different texture compared to regular peanut butter. If you choose natural peanut butter, you might want to adjust the sugar slightly to achieve your desired sweetness. Just make sure to stir it well before using, as natural peanut butter can separate.
How long can I store homemade ice cream?
You can store your Homemade Peanut Butter Cup Ice Cream in the freezer for about 2 to 3 weeks. To keep it fresh, make sure to place it in an airtight container. Press a piece of plastic wrap directly onto the surface of the ice cream before sealing the container. This helps prevent ice crystals from forming and keeps your ice cream creamy and delicious!
What can I substitute for heavy cream?
If you need a substitute for heavy cream, you have a few options. You can use full-fat coconut milk for a dairy-free alternative. It provides a rich texture similar to heavy cream. Another option is to mix equal parts of whole milk and unsalted butter. For every cup of heavy cream, use 3/4 cup of milk and 1/4 cup of melted butter. This will give you a similar creaminess in your ice cream.
Can I make this ice cream without an ice cream maker?
Absolutely! If you don’t have an ice cream maker, you can still make this delicious treat. Simply pour the mixture into a shallow dish and place it in the freezer. Every 30 minutes, stir the mixture with a fork to break up any ice crystals. Repeat this process for about 3 to 4 hours, or until the ice cream reaches your desired consistency. It may take a bit longer, but you’ll still end up with a tasty homemade ice cream!
Conclusion on Homemade Peanut Butter Cup Ice Cream
In conclusion, making your own Homemade Peanut Butter Cup Ice Cream is a delightful experience that combines creativity, quality ingredients, and the joy of indulging in a sweet treat. This recipe not only satisfies your cravings but also allows you to customize flavors and textures to suit your personal taste. Whether you’re enjoying it on a hot summer day or serving it at a gathering, this ice cream is sure to impress.
By following the simple steps outlined in this article, you can create a creamy, rich dessert that features the perfect balance of chocolate and peanut butter. Plus, with the variations and tips provided, you can easily adapt the recipe to fit dietary preferences or to experiment with new flavors. Remember, the key to a successful homemade ice cream lies in using high-quality ingredients and being patient during the churning process.
So, gather your loved ones, scoop out some of this delicious ice cream, and enjoy the smiles it brings. Homemade Peanut Butter Cup Ice Cream is not just a dessert; it’s a way to create sweet memories and share joy with those around you. Treat yourself and your family to this delightful dessert, and savor every creamy bite!
Relevant Recipes Link:
Craving more homemade ice cream recipes to satisfy your sweet tooth? Indulge in these delightful frozen treats:
- Homemade Vanilla Custard Ice Cream: A Rich and Creamy Classic
- Homemade Peach Ice Cream: A Refreshing Summer Dessert
- Homemade Baileys Ice Cream: A Decadent Boozy Indulgence
For more delightful recipes and culinary inspiration, follow us on Pinterest!