Introduction to Homemade Berry Your Heart Ice Cream
Are you ready to indulge in a delightful frozen treat? Look no further than this Homemade Berry Your Heart Ice Cream. This recipe is not just about satisfying your sweet tooth; it’s about creating a memorable experience. With its creamy texture and vibrant berry flavors, this ice cream is sure to become a favorite in your household.
Why You’ll Love This Recipe
First and foremost, this ice cream is incredibly easy to make. You don’t need to be a professional chef to whip up this delicious dessert. The combination of heavy cream and fresh berries creates a rich and velvety texture that melts in your mouth. Plus, the addition of berry jam adds a burst of flavor that will leave you wanting more. It’s a simple recipe that brings joy to every scoop!
Moreover, this ice cream is versatile. You can customize it with your favorite berries or even mix in some fresh mint for an extra refreshing twist. Whether you’re hosting a summer barbecue or enjoying a quiet evening at home, this ice cream is the perfect companion. It’s a delightful way to cool off on a hot day or to treat yourself after a long week.
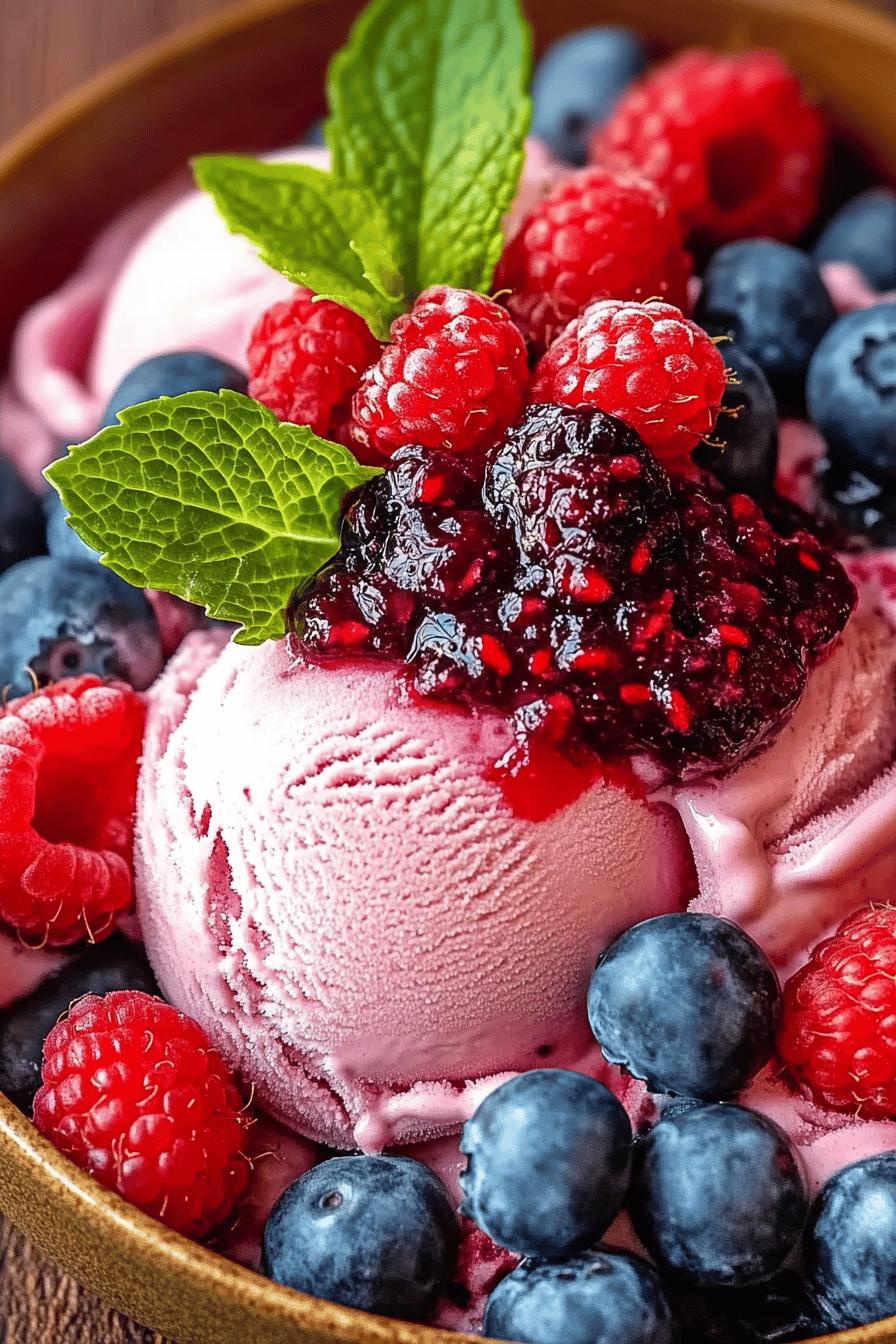
The Perfect Summer Treat
Summer is all about enjoying the outdoors, and what better way to celebrate than with a bowl of homemade ice cream? This Homemade Berry Your Heart Ice Cream is not only delicious but also visually appealing. The vibrant colors of the mixed berries make it a feast for the eyes. Serve it at your next gathering, and watch as your friends and family rave about it!
Additionally, this ice cream is a healthier alternative to store-bought options. You control the ingredients, ensuring that you’re using fresh, wholesome items. This means you can enjoy your dessert guilt-free. So, grab your mixing bowl and let’s dive into the ingredients needed to create this delightful summer treat!
Ingredients for Homemade Berry Your Heart Ice Cream
To create your own Homemade Berry Your Heart Ice Cream, you’ll need a few simple ingredients. Each one plays a vital role in achieving that creamy texture and fruity flavor. Here’s what you’ll need:
- 2 cups of heavy cream: This is the base of your ice cream, providing richness and creaminess.
- 1 cup of whole milk: It helps to balance the richness of the cream and adds a smooth texture.
- 3/4 cup of granulated sugar: This sweetens the ice cream and enhances the berry flavors.
- 1 teaspoon of vanilla extract: A touch of vanilla adds depth to the flavor profile.
- 1 cup of mixed fresh berries: You can use strawberries, blueberries, raspberries, or blackberries. Fresh berries bring vibrant flavors and colors.
- 1/2 cup of berry jam: This adds an extra burst of berry goodness and sweetness.
- Pinch of salt: A little salt enhances the overall flavor of the ice cream.
These ingredients are easy to find at your local grocery store. Feel free to experiment with different types of berries or even add in some fresh mint for a refreshing twist. Now that you have your ingredients ready, let’s move on to the step-by-step preparation of this delightful ice cream!
Step-by-Step Preparation of Homemade Berry Your Heart Ice Cream
Now that you have all your ingredients ready, it’s time to dive into the fun part: making your Homemade Berry Your Heart Ice Cream. Follow these simple steps, and you’ll have a delicious treat in no time!
Step 1: Gather Your Ingredients
Before you start, make sure you have everything you need. Gather your heavy cream, whole milk, sugar, vanilla extract, mixed berries, berry jam, and a pinch of salt. Having everything in one place makes the process smoother and more enjoyable. Plus, it’s a great way to get the kids involved!
Step 2: Prepare the Berry Mixture
Next, it’s time to prepare the berry mixture. Take your mixed fresh berries and wash them thoroughly. Once clean, chop larger berries like strawberries into smaller pieces. This helps them blend better into the ice cream. In a bowl, combine the chopped berries with the berry jam. Stir gently to coat the berries evenly. This mixture will add a burst of flavor to your ice cream!
Step 3: Whip the Cream
Now, let’s whip the cream! In a large mixing bowl, pour in the heavy cream. Using an electric mixer, beat the cream on medium speed until soft peaks form. This usually takes about 3-5 minutes. Be careful not to over-whip, or you might end up with butter instead of cream! The whipped cream should be light and fluffy, perfect for your ice cream base.
Step 4: Combine Ingredients
Once your cream is whipped, it’s time to combine everything. In a separate bowl, mix the whole milk, granulated sugar, vanilla extract, and a pinch of salt. Stir until the sugar dissolves completely. Then, gently fold this mixture into the whipped cream. Use a spatula to combine them without deflating the whipped cream. Finally, add in your berry mixture and fold it in until evenly distributed. The colors should be beautiful and vibrant!
Step 5: Churn the Ice Cream
Now comes the exciting part—churning! If you have an ice cream maker, pour the mixture into it and churn according to the manufacturer’s instructions. This usually takes about 20-30 minutes. If you don’t have an ice cream maker, don’t worry! You can pour the mixture into a shallow dish and place it in the freezer. Stir it every 30 minutes for about 2-3 hours until it reaches a creamy consistency.
Step 6: Freeze and Set
After churning, transfer your ice cream to an airtight container. Smooth the top with a spatula and cover it tightly. Place it in the freezer for at least 4 hours, or until it’s firm. This step is crucial for achieving that perfect scoopable texture. Once it’s set, your Homemade Berry Your Heart Ice Cream is ready to be enjoyed!
Now that you know how to prepare this delightful ice cream, let’s explore some fun variations you can try!
Variations of Homemade Berry Your Heart Ice Cream
While the classic Homemade Berry Your Heart Ice Cream is delicious on its own, there are many fun variations you can try! These options allow you to customize your ice cream to suit your taste or dietary needs. Let’s explore some exciting ideas!
Different Berry Combinations
One of the best things about this ice cream is its versatility. You can mix and match different berries to create unique flavors. Here are some berry combinations to consider:
- Strawberry and Blueberry: This classic combo offers a sweet and tangy flavor that’s hard to resist.
- Raspberry and Blackberry: These berries add a rich, deep flavor that pairs beautifully with the creaminess of the ice cream.
- Mixed Berry Medley: Combine strawberries, blueberries, raspberries, and blackberries for a colorful and flavorful treat!
- Peach and Berry: Add some chopped peaches to your berry mixture for a sweet and juicy twist.
Feel free to experiment with seasonal berries or whatever you have on hand. Each combination will bring its own unique taste to your ice cream, making it a fun adventure every time you make it!
Dairy-Free Options
If you’re looking for a dairy-free version of this ice cream, you’re in luck! You can easily substitute the dairy ingredients with plant-based alternatives. Here’s how:
- Coconut Cream: Use full-fat coconut cream instead of heavy cream. It adds a rich, tropical flavor.
- Almond Milk or Oat Milk: Replace whole milk with almond milk or oat milk for a creamy base.
- Maple Syrup or Agave Nectar: Instead of granulated sugar, use maple syrup or agave nectar for sweetness.
These substitutions will give you a delicious dairy-free Homemade Berry Your Heart Ice Cream that everyone can enjoy. Plus, it’s a great way to cater to those with lactose intolerance or dairy allergies!
Now that you have some variations in mind, let’s move on to a cooking note that will help you perfect your ice cream-making skills!
Cooking Note for Homemade Berry Your Heart Ice Cream
Making ice cream at home can be a fun and rewarding experience. However, there are a few cooking notes to keep in mind to ensure your Homemade Berry Your Heart Ice Cream turns out perfectly every time. Here are some tips to help you achieve the best results:
- Use Fresh Ingredients: The quality of your ingredients matters. Fresh berries will provide the best flavor and texture. If possible, choose organic berries for a more vibrant taste.
- Chill Your Mixture: Before churning, chill your ice cream mixture in the refrigerator for at least 30 minutes. This helps it churn faster and results in a creamier texture.
- Don’t Over-Churn: Keep an eye on your ice cream while it’s churning. Over-churning can lead to a grainy texture. Stop the machine once it reaches a soft-serve consistency.
- Let It Sit: After churning, let your ice cream sit at room temperature for about 5-10 minutes before scooping. This makes it easier to serve and enhances the flavor.
- Experiment with Add-Ins: Feel free to add in extras like chocolate chips, nuts, or cookie pieces during the last few minutes of churning. This adds texture and flavor to your ice cream.
By following these cooking notes, you’ll be well on your way to creating a delicious and creamy Homemade Berry Your Heart Ice Cream that everyone will love. Now, let’s explore some serving suggestions to make your ice cream experience even more delightful!
Serving Suggestions for Homemade Berry Your Heart Ice Cream
Now that you’ve made your Homemade Berry Your Heart Ice Cream, it’s time to think about how to serve it! The right toppings and pairings can elevate your dessert experience. Here are some delightful suggestions to enhance your ice cream enjoyment.
Toppings to Enhance Your Ice Cream
Toppings can add texture and flavor to your ice cream. Here are some tasty options to consider:
- Fresh Berries: Top your ice cream with additional fresh berries for a burst of color and flavor. Strawberries, blueberries, and raspberries work wonderfully!
- Whipped Cream: A dollop of whipped cream adds a light and fluffy touch. You can even sprinkle some cocoa powder or cinnamon on top for extra flair.
- Chocolate Sauce: Drizzle warm chocolate sauce over your ice cream for a rich and indulgent treat. It pairs perfectly with the fruity flavors.
- Chopped Nuts: Add some crunch with chopped almonds, walnuts, or pecans. Nuts provide a delightful contrast to the creamy ice cream.
- Granola: For a healthier option, sprinkle granola on top. It adds a nice crunch and a hint of sweetness.
Feel free to mix and match these toppings to create your perfect bowl of ice cream. The possibilities are endless!
Pairing with Other Desserts
Your Homemade Berry Your Heart Ice Cream can also shine when paired with other desserts. Here are some ideas:
- Brownies: Serve a scoop of ice cream on top of warm brownies for a decadent dessert. The combination of chocolate and berries is simply irresistible.
- Fruit Tart: A slice of fruit tart complements the ice cream beautifully. The creamy filling and flaky crust pair well with the berry flavors.
- Pancakes or Waffles: For a fun breakfast twist, add a scoop of ice cream to pancakes or waffles. Drizzle with maple syrup for a sweet start to your day!
- Pie: Enjoy your ice cream alongside a slice of berry pie. The warm pie and cold ice cream create a delightful contrast.
These serving suggestions will not only enhance your ice cream experience but also impress your family and friends. Now that you know how to serve your Homemade Berry Your Heart Ice Cream, let’s move on to some tips for making the best ice cream possible!
Tips for Making the Best Homemade Berry Your Heart Ice Cream
To ensure your Homemade Berry Your Heart Ice Cream turns out perfectly every time, here are some helpful tips. These suggestions will guide you in choosing the right ingredients and storing your ice cream for maximum freshness.
Choosing the Right Berries
The berries you select can make a big difference in the flavor of your ice cream. Here are some tips for choosing the best berries:
- Freshness is Key: Always opt for fresh berries when possible. Look for berries that are plump, firm, and free from mold. Fresh berries will provide the best flavor and texture.
- Seasonal Choices: Use seasonal berries for the best taste. Strawberries in spring, blueberries in summer, and raspberries in late summer are all excellent choices.
- Organic Options: If you can, choose organic berries. They tend to have a richer flavor and are free from harmful pesticides.
- Mix and Match: Don’t hesitate to combine different types of berries. Mixing flavors can create a more complex and delicious ice cream.
By selecting the right berries, you’ll enhance the overall taste of your Homemade Berry Your Heart Ice Cream. Now, let’s talk about how to store your ice cream properly.
Storage Tips for Ice Cream
Proper storage is essential to keep your ice cream fresh and delicious. Here are some tips to help you store your homemade treat:
- Airtight Containers: Always store your ice cream in airtight containers. This prevents ice crystals from forming and keeps your ice cream creamy.
- Label and Date: If you make multiple flavors, label your containers with the flavor and date. This helps you keep track of freshness.
- Freezer Temperature: Ensure your freezer is set to 0°F (-18°C) or lower. This keeps your ice cream at the right consistency and prevents it from becoming too hard.
- Limit Air Exposure: When storing, press a piece of plastic wrap directly onto the surface of the ice cream before sealing the container. This minimizes air exposure and helps maintain texture.
- Consume Within a Month: For the best flavor and texture, try to consume your homemade ice cream within a month. While it can last longer, the quality may decline over time.
By following these storage tips, you can enjoy your Homemade Berry Your Heart Ice Cream at its best. Now that you’re equipped with these tips, let’s break down the time needed to make this delightful treat!
Breakdown of Time for Homemade Berry Your Heart Ice Cream
Understanding the time required to make your Homemade Berry Your Heart Ice Cream can help you plan better. Here’s a simple breakdown of the time you’ll need for each step of the process.
Prep Time
The prep time for this delightful ice cream is quite short. You’ll need about 15-20 minutes to gather your ingredients and prepare the berry mixture. This includes washing and chopping the berries, as well as mixing the other ingredients. It’s a great time to involve your family or friends, making it a fun activity!
Cooking Time
Once your ingredients are ready, the cooking time mainly involves whipping the cream and churning the ice cream. Whipping the cream takes about 5 minutes. If you’re using an ice cream maker, churning will take around 20-30 minutes. If you’re doing it without an ice cream maker, you’ll need to stir the mixture every 30 minutes for about 2-3 hours. So, the total cooking time can vary based on your method.
Total Time
In total, you can expect to spend about 30-40 minutes actively preparing and cooking your ice cream. However, don’t forget to factor in the freezing time! After churning, your ice cream will need at least 4 hours in the freezer to set properly. So, while the active time is short, plan for a total of about 4-5 hours from start to finish, including freezing time. This makes it perfect for preparing ahead of a summer gathering or a special dessert night!
Now that you have a clear idea of the time involved, let’s take a look at the nutritional information for your Homemade Berry Your Heart Ice Cream!
Nutritional Information for Homemade Berry Your Heart Ice Cream
Understanding the nutritional content of your Homemade Berry Your Heart Ice Cream can help you enjoy it even more. This delicious treat not only satisfies your sweet cravings but also provides some essential nutrients. Here’s a breakdown of the nutritional information per serving (approximately 1/2 cup):
Calories
Each serving of this creamy ice cream contains about 250-300 calories. The calorie count can vary based on the specific ingredients you use, especially if you opt for different types of milk or sweeteners. While it’s a treat, it’s important to enjoy it in moderation!
Protein
This ice cream provides around 3-4 grams of protein per serving. The protein mainly comes from the heavy cream and whole milk used in the recipe. Protein is essential for building and repairing tissues, making this ice cream a tasty way to get a little boost!
Sodium
In terms of sodium, each serving contains approximately 50-70 milligrams. This is relatively low, especially considering that sodium is often higher in processed foods. The pinch of salt added enhances the flavor without significantly increasing the sodium content.
Overall, your Homemade Berry Your Heart Ice Cream can be a delightful addition to your dessert options. It’s a treat that balances flavor and nutrition, making it a great choice for summer gatherings or a cozy night in. Now that you know the nutritional information, let’s address some frequently asked questions about this delicious ice cream!
FAQs about Homemade Berry Your Heart Ice Cream
Can I use frozen berries for this recipe?
Absolutely! You can use frozen berries in your Homemade Berry Your Heart Ice Cream. Just make sure to thaw them before mixing. Thawing helps release their juices, which will enhance the flavor of your ice cream. Keep in mind that frozen berries may result in a slightly different texture, but they will still taste delicious!
How long does homemade ice cream last in the freezer?
Your Homemade Berry Your Heart Ice Cream can last in the freezer for about 2-3 weeks. However, for the best flavor and texture, it’s recommended to enjoy it within a month. After that, ice crystals may form, affecting the creaminess. Always store it in an airtight container to keep it fresh for as long as possible!
Can I make this ice cream without an ice cream maker?
Yes, you can definitely make this ice cream without an ice cream maker! Simply pour the mixture into a shallow dish and place it in the freezer. Stir the mixture every 30 minutes for about 2-3 hours. This will help break up any ice crystals and create a creamy texture. It may take a bit longer, but the results will be just as tasty!
What can I substitute for heavy cream?
If you’re looking for a substitute for heavy cream, there are several options. You can use full-fat coconut cream for a dairy-free version, which adds a rich flavor. Alternatively, you can blend silken tofu with a bit of almond milk to create a creamy base. Keep in mind that these substitutes may alter the flavor slightly, but they can still yield a delicious Homemade Berry Your Heart Ice Cream.
Conclusion on Homemade Berry Your Heart Ice Cream
Recap of the Recipe Benefits
In summary, the Homemade Berry Your Heart Ice Cream is not just a dessert; it’s a delightful experience. This recipe combines the richness of heavy cream with the vibrant flavors of fresh berries, creating a treat that is both creamy and refreshing. You have the freedom to customize it with your favorite berries or even try dairy-free alternatives. Plus, making it at home means you control the ingredients, ensuring a healthier option compared to store-bought ice creams.
With its easy preparation and the joy of creating something delicious, this ice cream is perfect for summer gatherings, family celebrations, or simply treating yourself after a long day. The vibrant colors and flavors will surely impress your friends and family, making it a go-to recipe for any occasion.
Encouragement to Try It Out
So, what are you waiting for? Grab your ingredients and start making your own Homemade Berry Your Heart Ice Cream today! Whether you’re a seasoned chef or a beginner in the kitchen, this recipe is simple and fun to make. Enjoy the process, and don’t forget to share your delicious creation with loved ones. You might just inspire them to whip up their own batch!
Remember, the joy of homemade ice cream lies not only in the final product but also in the memories you create while making it. So, dive into this fruity adventure and savor every scoop of your delightful ice cream. Happy churning!
Relevant Recipes Link:
Looking to indulge in more homemade ice cream delights? Try these irresistible recipes:
- Butter Pecan Ice Cream: A Summer Treat
- Brownie Chunk Ice Cream: A Decadent Must-Try
- Strawberry Vanilla Bean Ice Cream: Pure Delight
For more delectable recipes and culinary inspiration, follow us on Pinterest!