Introduction to Cheesy Baked Corn on the Cob
Are you ready to take your corn on the cob to the next level? If so, you’re in for a treat! Cheesy Baked Corn on the Cob is not just a dish; it’s an experience. Imagine biting into fresh corn, slathered in rich garlic butter, and topped with a gooey cheese blend. It’s a delightful combination that will make your taste buds dance with joy!
Why Cheesy Baked Corn on the Cob is a Must-Try
First off, this recipe is incredibly easy to make. You don’t need to be a master chef to whip it up. Just a few simple ingredients and a little time in the oven will yield a dish that impresses everyone. Whether you’re hosting a summer BBQ or enjoying a cozy dinner at home, this cheesy delight fits right in.
Moreover, it’s a versatile side dish. You can serve it alongside grilled meats, salads, or even as a snack. The cheesy goodness pairs well with many flavors, making it a crowd-pleaser. Plus, it’s vegetarian-friendly, so everyone can enjoy it!
Lastly, let’s not forget about the health benefits of corn. It’s packed with vitamins and minerals, making it a nutritious addition to your meal. When you combine it with cheese and garlic, you create a dish that’s not only tasty but also satisfying.
So, if you’re looking for a new way to enjoy corn on the cob, this Cheesy Baked Corn on the Cob recipe is a must-try. Get ready to impress your family and friends with this delicious and easy-to-make side dish!
Ingredients for Cheesy Baked Corn on the Cob
To create the mouthwatering Cheesy Baked Corn on the Cob, you’ll need a few simple ingredients. Each one plays a vital role in bringing out the flavors and ensuring a delightful experience. Here’s what you’ll need:
- 4 ears of fresh corn on the cob
- 1/2 cup unsalted butter, melted
- 3 cloves of garlic, minced
- 1 cup shredded cheese (cheddar, mozzarella, or a blend)
- 1/4 cup grated Parmesan cheese
- Salt and pepper to taste
- Chopped fresh parsley or cilantro for garnish (optional)
These ingredients are easy to find at your local grocery store. Fresh corn is best, especially during the summer months when it’s in season. The garlic butter adds a rich flavor, while the cheese creates that irresistible gooey texture. Feel free to mix and match the types of cheese you use to suit your taste!
Now that you have your ingredients ready, let’s move on to the next step: preparing the corn. This is where the fun begins!
Step-by-Step Preparation of Cheesy Baked Corn on the Cob
Now that you have your ingredients ready, it’s time to dive into the preparation of your Cheesy Baked Corn on the Cob. Follow these simple steps to create a dish that will have everyone asking for seconds!
Step 1: Preparing the Corn
First, you need to prepare the corn. Start by removing the husks and silk from each ear of corn. Rinse them under cold water to ensure they are clean. After that, you can break the corn in half if you prefer smaller pieces. This makes it easier to serve and eat. Set the prepared corn aside while you move on to the next step.
Step 2: Making the Garlic Butter
Next, let’s make the garlic butter. In a small bowl, combine the melted unsalted butter with the minced garlic. Stir well to mix the flavors. The aroma of garlic will fill your kitchen, making it hard to resist! This garlic butter will add a rich, savory flavor to your corn.
Step 3: Coating the Corn
Now it’s time to coat the corn with that delicious garlic butter. Using a brush or a spoon, generously apply the garlic butter all over each ear of corn. Make sure to cover every inch for maximum flavor. Once coated, sprinkle salt and pepper to taste. This step is crucial as it enhances the overall taste of the dish.
Step 4: Adding the Cheese
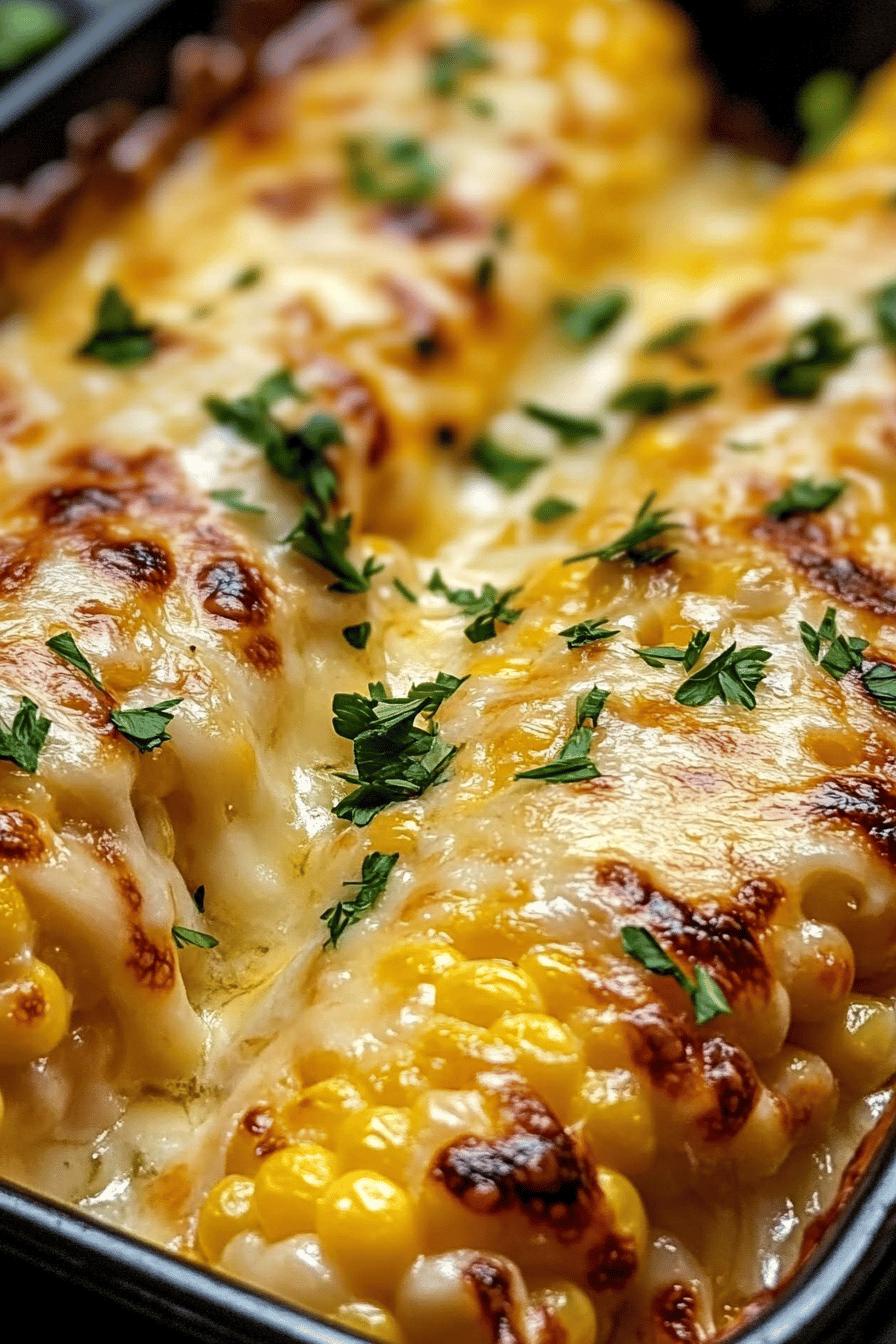
After coating the corn, it’s time to add the cheese! Start by sprinkling the shredded cheese blend evenly over the corn. Then, add the grated Parmesan cheese on top for an extra layer of flavor. The combination of cheeses will melt beautifully in the oven, creating that gooey, cheesy goodness we all love.
Step 5: Baking the Corn
Finally, it’s time to bake the corn! Preheat your oven to 400°F (200°C). Place the coated corn on a baking sheet lined with parchment paper. Bake for about 20-25 minutes, or until the cheese is bubbly and golden brown. Keep an eye on it to prevent burning. Once done, remove the corn from the oven and let it cool for a few minutes. Your Cheesy Baked Corn on the Cob is now ready to be served!
With these easy steps, you’ll have a delicious side dish that’s perfect for any occasion. Enjoy the cheesy, buttery goodness!
Variations of Cheesy Baked Corn on the Cob
While the classic Cheesy Baked Corn on the Cob is already a hit, why not spice things up a bit? There are many fun variations you can try. Each one adds a unique twist to this delicious dish. Let’s explore two exciting options: Spicy Cheesy Baked Corn on the Cob and Herb-Infused Cheesy Baked Corn on the Cob.
Spicy Cheesy Baked Corn on the Cob
If you love a little heat, this variation is for you! To make Spicy Cheesy Baked Corn on the Cob, simply add some heat to your garlic butter. Start by mixing in 1-2 teaspoons of chili powder or cayenne pepper. You can adjust the amount based on your spice preference. For an extra kick, consider adding diced jalapeños or crushed red pepper flakes to the cheese topping. This spicy version will tantalize your taste buds and add a fun twist to your BBQ spread!
Herb-Infused Cheesy Baked Corn on the Cob
For those who enjoy fresh flavors, the Herb-Infused Cheesy Baked Corn on the Cob is a delightful choice. To create this variation, mix chopped fresh herbs into your garlic butter. Basil, thyme, or rosemary work wonderfully. You can also sprinkle some dried Italian herbs over the cheese before baking. This herbaceous twist will elevate the dish, making it fragrant and flavorful. It’s a perfect option for a garden party or a family dinner!
These variations not only enhance the flavor but also allow you to customize the dish to suit your guests’ preferences. So, whether you’re in the mood for something spicy or fresh, these options will surely impress!
Cooking Note for Cheesy Baked Corn on the Cob
When preparing your Cheesy Baked Corn on the Cob, there are a few important cooking notes to keep in mind. These tips will help ensure that your dish turns out perfectly every time. Let’s dive into some key points to consider!
First, always choose fresh corn when possible. Fresh corn not only tastes better but also has a crisp texture that enhances the overall dish. Look for ears with bright green husks and plump kernels. If you can, buy corn from local farmers’ markets during the summer months for the best flavor.
Next, don’t skip the soaking step if you decide to grill the corn instead of baking it. Soaking the corn in water for about 30 minutes before grilling helps prevent it from drying out. This method also allows the kernels to steam slightly, resulting in juicy, tender corn.
Additionally, feel free to experiment with different cheese combinations. While cheddar and mozzarella are popular choices, you can also try gouda, pepper jack, or even feta for a unique flavor profile. Mixing cheeses can create a delightful taste experience that will surprise your guests!
Lastly, keep an eye on the baking time. Ovens can vary, so check your corn a few minutes before the suggested time. You want the cheese to be bubbly and golden brown, but not burnt. If you notice the cheese browning too quickly, you can cover the corn loosely with aluminum foil to prevent over-browning.
By following these cooking notes, you’ll be well on your way to creating a delicious and satisfying Cheesy Baked Corn on the Cob that everyone will love. Happy cooking!
Serving Suggestions for Cheesy Baked Corn on the Cob
Now that your Cheesy Baked Corn on the Cob is ready, it’s time to think about how to serve it! This dish is not only delicious but also versatile, making it a fantastic addition to various meals. Here are some serving suggestions to elevate your dining experience:
- As a Side Dish: Pair your cheesy corn with grilled meats like chicken, steak, or ribs. The rich flavors of the cheese and garlic complement the smoky taste of grilled foods perfectly.
- With Salads: Serve the corn alongside a fresh garden salad or a classic coleslaw. The crunch of the vegetables balances the creamy texture of the corn, creating a delightful contrast.
- At BBQs: This dish is a must-have for summer BBQs! Set it out on the buffet table as a side option. Guests will love the cheesy goodness, and it’s sure to be a hit!
- As a Snack: Enjoy Cheesy Baked Corn on the Cob as a tasty snack. Cut the corn into smaller pieces for easy handling. It’s perfect for movie nights or casual gatherings with friends.
- With Dips: Consider serving the corn with a side of ranch dressing or spicy mayo for dipping. This adds an extra layer of flavor and makes it even more enjoyable!
Feel free to get creative with your serving ideas! The beauty of Cheesy Baked Corn on the Cob is its ability to fit into any meal or occasion. Whether you’re hosting a fancy dinner or a casual get-together, this dish will surely impress your guests and leave them wanting more!
Tips for Perfect Cheesy Baked Corn on the Cob
To ensure your Cheesy Baked Corn on the Cob turns out perfectly every time, here are some handy tips to keep in mind. These simple suggestions will help you achieve that ideal balance of flavor and texture, making your dish a standout at any meal!
- Choose the Right Corn: Always opt for fresh, in-season corn. Look for ears with bright green husks and plump, juicy kernels. Fresh corn has a natural sweetness that enhances the overall flavor of your dish.
- Don’t Overcook: Keep an eye on your baking time. Overcooked corn can become tough and chewy. Aim for a baking time of 20-25 minutes, but check for doneness a few minutes early. You want the cheese to be bubbly and golden, not burnt.
- Experiment with Cheese: While cheddar and mozzarella are classic choices, don’t hesitate to mix it up! Try adding gouda, pepper jack, or even a sprinkle of feta for a unique twist. Different cheeses can bring new flavors to your dish.
- Use Fresh Herbs: Fresh herbs can elevate the flavor of your Cheesy Baked Corn on the Cob. Consider adding chopped basil, cilantro, or parsley to the garlic butter for an extra burst of freshness.
- Let It Rest: After baking, allow the corn to cool for a few minutes before serving. This helps the cheese set slightly, making it easier to eat and enjoy. Plus, it gives you a moment to prepare your serving platter!
- Garnish for Presentation: A sprinkle of chopped fresh herbs or a dash of paprika can make your dish visually appealing. A beautiful presentation can enhance the dining experience and impress your guests.
- Pair with the Right Dips: Consider serving your Cheesy Baked Corn on the Cob with a side of ranch dressing, garlic aioli, or spicy mayo. Dips can add an exciting flavor dimension and make the dish even more enjoyable.
By following these tips, you’ll create a Cheesy Baked Corn on the Cob that’s not only delicious but also visually stunning. Your family and friends will be raving about this dish long after the meal is over!
Breakdown of Time for Cheesy Baked Corn on the Cob
Understanding the time needed for each step in making Cheesy Baked Corn on the Cob can help you plan your cooking better. Here’s a simple breakdown of the time required for preparation and cooking. This way, you can enjoy your delicious dish without any rush!
Prep Time
The prep time for Cheesy Baked Corn on the Cob is quite short. You’ll need about 10-15 minutes to gather your ingredients and prepare the corn. This includes husking the corn, making the garlic butter, and coating the corn with the butter and cheese. It’s a quick process that allows you to get right into the fun of cooking!
Cooking Time
Once your corn is prepped, the cooking time is approximately 20-25 minutes. Preheat your oven to 400°F (200°C) and bake the corn until the cheese is bubbly and golden brown. Keep an eye on it to ensure it doesn’t overcook. This step is crucial for achieving that perfect cheesy texture!
Total Time
In total, you can expect to spend about 30-40 minutes from start to finish. This includes both prep and cooking time. It’s a quick and easy recipe that fits perfectly into a busy schedule. Plus, the delicious results are well worth the time spent!
With this time breakdown, you can easily plan your meal and enjoy the delightful experience of making Cheesy Baked Corn on the Cob. Happy cooking!
Nutritional Information for Cheesy Baked Corn on the Cob
Understanding the nutritional content of your Cheesy Baked Corn on the Cob can help you make informed choices about your meals. This dish is not only delicious but also offers some nutritional benefits. Here’s a breakdown of the key nutritional components:
Calories
One serving of Cheesy Baked Corn on the Cob contains approximately 250-300 calories. This can vary based on the amount of cheese and butter used. While it’s a comforting dish, it’s important to enjoy it in moderation, especially if you’re watching your calorie intake. The combination of corn and cheese provides a satisfying treat that can fit into a balanced diet.
Protein
In terms of protein, each serving offers about 8-10 grams. The protein comes mainly from the cheese and corn. Cheese is a good source of protein, which is essential for muscle repair and growth. Corn also contributes a small amount of protein, making this dish a decent option for a vegetarian side. If you want to boost the protein content, consider adding some grilled chicken or beans to your meal.
Sodium
When it comes to sodium, a serving of Cheesy Baked Corn on the Cob typically contains around 400-500 milligrams. This amount can vary based on how much salt you add and the type of cheese used. If you’re watching your sodium intake, you can reduce the salt in the garlic butter or opt for low-sodium cheese options. Balancing flavors without excessive salt can still yield a delicious dish!
Overall, Cheesy Baked Corn on the Cob is a delightful side dish that can be enjoyed as part of a healthy diet. With its comforting flavors and satisfying texture, it’s a great addition to any meal. Just remember to enjoy it alongside other nutritious foods for a well-rounded dining experience!
FAQs about Cheesy Baked Corn on the Cob
Can I use frozen corn for Cheesy Baked Corn on the Cob?
Yes, you can use frozen corn for Cheesy Baked Corn on the Cob! However, it’s best to thaw the corn first. You can do this by placing it in the refrigerator overnight or by running it under warm water for a few minutes. Once thawed, follow the same steps as you would with fresh corn. Keep in mind that the texture may be slightly different, but it will still be delicious!
What types of cheese work best for Cheesy Baked Corn on the Cob?
When it comes to cheese, the options are endless! Cheddar and mozzarella are popular choices because they melt beautifully and add great flavor. You can also try gouda for a smoky taste or pepper jack for a spicy kick. If you want a tangy twist, feta cheese works well too. Feel free to mix and match your favorite cheeses to create a unique flavor profile!
How can I make Cheesy Baked Corn on the Cob ahead of time?
If you want to prepare Cheesy Baked Corn on the Cob ahead of time, you can do so easily! Simply follow the recipe up to the baking step. After coating the corn with garlic butter and cheese, cover it tightly with plastic wrap or aluminum foil and store it in the refrigerator. When you’re ready to bake, just preheat your oven and pop it in. You may need to add a few extra minutes to the baking time if it’s cold from the fridge.
Is Cheesy Baked Corn on the Cob suitable for vegetarians?
Absolutely! Cheesy Baked Corn on the Cob is a vegetarian-friendly dish. It’s made with fresh corn, garlic butter, and cheese, all of which are suitable for a vegetarian diet. Just be sure to check the cheese labels if you’re serving strict vegetarians, as some cheeses may contain animal rennet. Overall, this dish is a great option for anyone looking for a tasty vegetarian side!
Conclusion on Cheesy Baked Corn on the Cob
In conclusion, Cheesy Baked Corn on the Cob is a delightful dish that brings joy to any meal. Its combination of fresh corn, rich garlic butter, and melty cheese creates a flavor explosion that is hard to resist. Whether you’re enjoying it at a summer BBQ or as a comforting side dish during the colder months, this recipe is sure to impress.
Not only is it easy to prepare, but it also offers room for creativity. With variations like Spicy Cheesy Baked Corn or Herb-Infused Cheesy Baked Corn, you can customize the dish to suit your taste. Plus, it’s a vegetarian-friendly option that everyone can enjoy, making it a perfect addition to any gathering.
Remember to follow the tips and cooking notes provided to ensure your Cheesy Baked Corn on the Cob turns out perfectly every time. From selecting the freshest corn to experimenting with different cheeses, each step contributes to the overall success of the dish.
So, gather your ingredients, preheat your oven, and get ready to create a cheesy masterpiece that will have your family and friends coming back for more. Enjoy the deliciousness of Cheesy Baked Corn on the Cob, and make it a staple in your recipe collection!
Relevant Recipes Link:
Looking to add more cheesy goodness to your meals? Try these irresistible recipes:
- Cheesy Creamed Corn Casserole: A Must-Try Dish
- Cheesy Baked Chicken and Broccoli Casserole: A Delightful Combination
- Cheesy Baked Bell Pepper Slices: A Tasty Side Dish
For more delicious recipes and culinary inspiration, follow us on Pinterest!