Introduction to Old Fashioned Butter Cake with Chocolate Icing
The Allure of Classic Desserts
There’s something truly special about classic desserts. They evoke warm memories and bring a sense of nostalgia. Old Fashioned Butter Cake with Chocolate Icing is one such dessert that has stood the test of time. This cake is not just a treat; it’s a celebration of flavors and textures that many have cherished for generations.
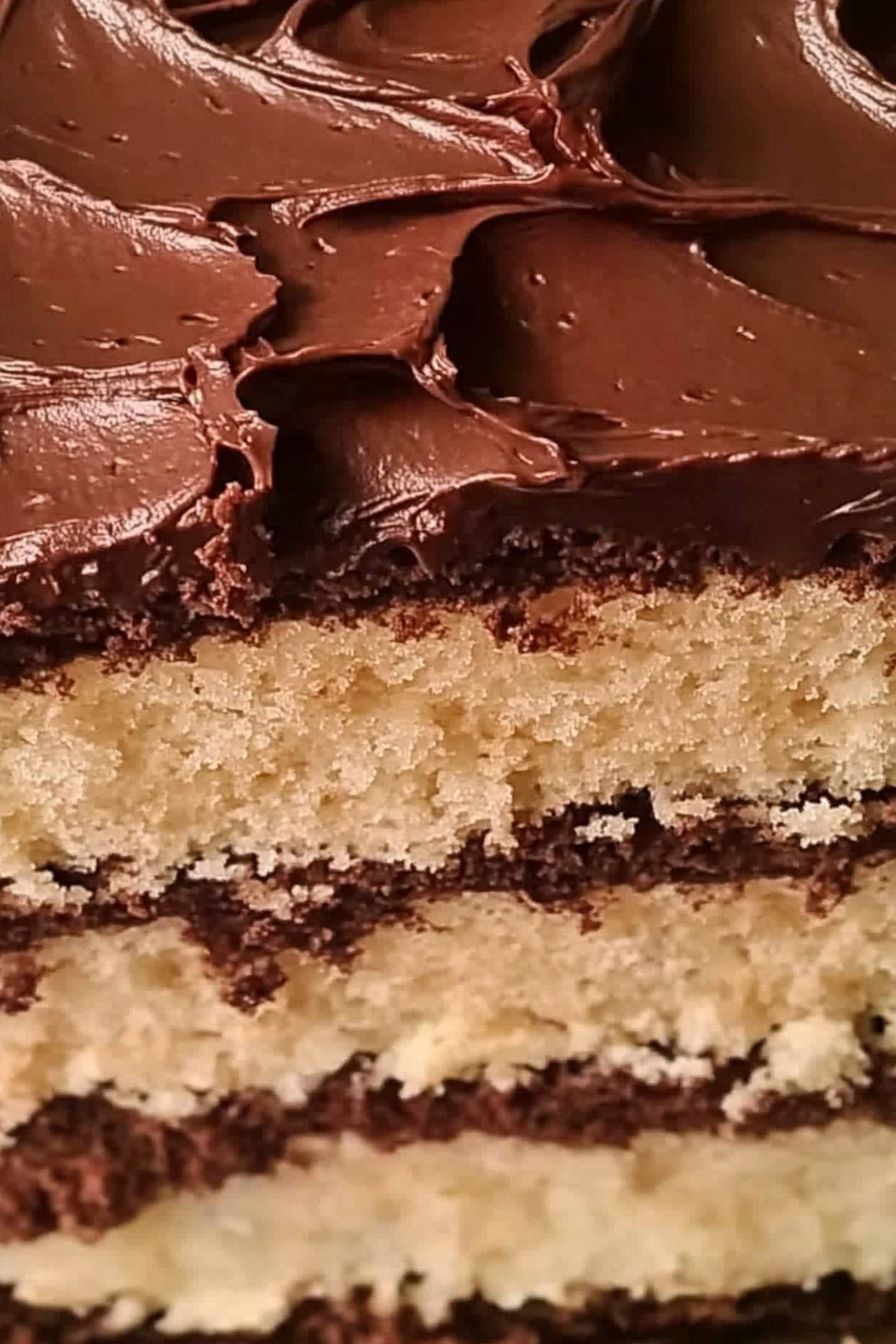
Imagine a moist, buttery cake layered with rich chocolate icing. Each bite melts in your mouth, leaving you craving more. This cake is perfect for birthdays, holidays, or any gathering where you want to impress your guests. The combination of the soft cake and the creamy icing creates a delightful experience that is hard to resist.
Moreover, making this cake is a wonderful way to bond with family and friends. Baking together can create lasting memories, and sharing the finished product is even more rewarding. Whether you’re a seasoned baker or a novice, this recipe is straightforward and easy to follow. You’ll find joy in every step, from mixing the ingredients to frosting the cake.
In the following sections, we will explore the ingredients, preparation steps, and tips to ensure your Old Fashioned Butter Cake with Chocolate Icing turns out perfectly. So, roll up your sleeves and get ready to create a dessert that will delight everyone!
Ingredients for Old Fashioned Butter Cake with Chocolate Icing
To create the delightful Old Fashioned Butter Cake with Chocolate Icing, you’ll need a selection of quality ingredients. Each component plays a vital role in achieving that perfect balance of flavor and texture. Here’s what you’ll need:
- 4 cups White Lily all-purpose flour, sifted
- 2 1/2 cups Dixie Crystals extra fine granulated sugar
- 4 teaspoons baking powder
- 3/4 teaspoon salt
- 1 cup unsalted butter, softened
- 2 cups milk
- 1 teaspoon butter extract
- 1 teaspoon pure vanilla extract
- 5 large eggs
- Bakers Joy baking spray
For the rich chocolate icing, gather the following ingredients:
- 3 cups Dixie Crystals extra fine granulated sugar
- 1 stick unsalted butter
- 1/3 plus 1 tablespoon Hershey’s cocoa powder
- 10 oz. Carnation evaporated milk
- 1 teaspoon pure vanilla extract
Using high-quality ingredients, like White Lily flour and Dixie Crystals sugar, will enhance the flavor and texture of your cake. The butter extract and vanilla extract add a lovely aroma and depth to the cake. Remember, fresh eggs are essential for achieving that light and fluffy texture.
Now that you have all the ingredients ready, you’re one step closer to baking this delicious cake. In the next section, we will guide you through the step-by-step preparation of the Old Fashioned Butter Cake with Chocolate Icing.
Step-by-Step Preparation of Old Fashioned Butter Cake with Chocolate Icing
Step 1: Preheat the Oven
First things first, preheating your oven is crucial. Set it to 350 degrees Fahrenheit. If you’re using dark-coated pans, lower the temperature to 325 degrees. This ensures even baking and prevents the cake from browning too quickly.
Step 2: Prepare the Baking Pans
Next, it’s time to prepare your baking pans. Grab four 9-inch x 2-inch baking pans. Spray them generously with Bakers Joy baking spray. This will help the cake layers release easily after baking. Make sure to cover the entire surface for best results.
Step 3: Mix the Dry Ingredients
In a large mixing bowl, sift together the dry ingredients. Combine 4 cups of White Lily all-purpose flour, 2 1/2 cups of Dixie Crystals extra fine granulated sugar, 4 teaspoons of baking powder, and 3/4 teaspoon of salt. Sifting helps to aerate the flour, making your cake light and fluffy.
Step 4: Combine Wet Ingredients
Now, it’s time to mix the wet ingredients. Add 1 cup of softened unsalted butter, 2 cups of milk, 1 teaspoon of butter extract, and 1 teaspoon of pure vanilla extract to the dry mixture. Beat everything together for about 2 to 3 minutes until the mixture is smooth and well combined.
Step 5: Incorporate the Eggs
Next, add 5 large eggs to the batter. Beat the mixture for another 2 to 3 minutes. This step is essential as it helps to incorporate air into the batter, which contributes to the cake’s light texture.
Step 6: Bake the Cake Layers
Once your batter is ready, it’s time to bake! Divide the batter equally among the prepared pans. Place them in the preheated oven and bake for about 28 minutes. To check if they’re done, insert a toothpick into the center. If it comes out clean, your cake layers are ready!
Step 7: Cool the Cake
After baking, let the cake layers cool in the pans for about 10 minutes. Then, carefully transfer them to a cooling rack. Allow them to cool completely before frosting. This step is important; frosting a warm cake can cause the icing to melt and slide off.
Now that your cake layers are baked and cooled, you’re ready to move on to making the rich chocolate icing. In the next section, we will guide you through the process of preparing the icing that will take your Old Fashioned Butter Cake to the next level!
Chocolate Icing for Old Fashioned Butter Cake
Step 1: Prepare the Icing Mixture
To create the luscious chocolate icing, start by gathering your ingredients. In a clean 4-quart saucepan, combine 3 cups of Dixie Crystals extra fine granulated sugar and 1/3 plus 1 tablespoon of Hershey’s cocoa powder. Whisk these two dry ingredients together until they are well blended. This step is crucial as it ensures that the cocoa is evenly distributed, preventing any clumps in your icing.
Step 2: Cook the Icing
Next, it’s time to add the wet ingredients. Pour in 10 oz. of Carnation evaporated milk and place the saucepan over medium heat. Stir the mixture constantly to avoid burning. As it heats up, you’ll notice the sugar dissolving and the mixture becoming smooth. Once it reaches a gentle boil, add 1 stick of unsalted butter. Continue to whisk the icing as it cooks. Keep stirring until the icing thickens, which usually takes about 5 to 10 minutes. Be patient; this step is key to achieving that perfect, creamy texture!
Step 3: Frost the Cake
Once your icing has thickened, remove the saucepan from the heat. Stir in 1 teaspoon of pure vanilla extract for added flavor. Allow the icing to cool slightly before frosting your cake. This will help it set better on the cake layers. When the cake layers are completely cool, place one layer on a serving plate. Pour a generous amount of icing on top and spread it evenly. Repeat this process for the remaining layers, stacking them as you go. Finally, use any leftover icing to cover the top and sides of the cake. The result? A beautifully frosted Old Fashioned Butter Cake that looks as good as it tastes!
Now that your cake is frosted, it’s time to enjoy the fruits of your labor. In the next section, we will explore some delightful variations of this classic recipe that you can try!
Variations of Old Fashioned Butter Cake with Chocolate Icing
Alternative Flavors and Add-ins
While the classic Old Fashioned Butter Cake with Chocolate Icing is a beloved favorite, there are many ways to put a unique twist on this delightful dessert. By experimenting with different flavors and add-ins, you can create a cake that suits your taste or the occasion perfectly. Here are some fun variations to consider:
- Citrus Zest: Add a burst of freshness by incorporating the zest of one lemon or orange into the batter. This will give your cake a light, zesty flavor that pairs beautifully with chocolate icing.
- Almond Extract: Swap out the butter extract for almond extract for a nutty twist. Just a teaspoon will enhance the flavor profile and add a delightful aroma.
- Chocolate Chips: For chocolate lovers, fold in 1 cup of semi-sweet chocolate chips into the batter before baking. This will create pockets of melted chocolate throughout the cake, making each bite even more indulgent.
- Nutty Goodness: Add 1 cup of chopped nuts, such as walnuts or pecans, to the batter for a crunchy texture. Nuts add a wonderful contrast to the soft cake and rich icing.
- Fruit Fillings: Consider layering the cake with fresh berries or fruit preserves between the cake layers. Strawberries, raspberries, or even a layer of lemon curd can add a refreshing touch.
- Spices: For a warm flavor, add 1 teaspoon of cinnamon or nutmeg to the dry ingredients. This will give your cake a cozy, spiced aroma that’s perfect for fall gatherings.
These variations not only enhance the flavor but also allow you to personalize your Old Fashioned Butter Cake with Chocolate Icing. Feel free to mix and match these ideas to create a cake that reflects your style and preferences. In the next section, we will share some cooking notes to ensure your cake turns out perfectly every time!
Cooking Note for Old Fashioned Butter Cake with Chocolate Icing
When it comes to baking, a few key tips can make all the difference in achieving the perfect Old Fashioned Butter Cake with Chocolate Icing. Here are some essential cooking notes to keep in mind:
- Room Temperature Ingredients: Ensure that your butter, eggs, and milk are at room temperature before mixing. This helps create a smooth batter and ensures even baking.
- Measure Accurately: Baking is a science, so measuring your ingredients accurately is crucial. Use a kitchen scale for precise measurements, especially for flour and sugar.
- Don’t Overmix: While it’s important to mix the batter well, overmixing can lead to a dense cake. Mix just until the ingredients are combined, especially after adding the eggs.
- Check for Doneness: Ovens can vary in temperature. Always check your cake layers a few minutes before the suggested baking time. Insert a toothpick into the center; if it comes out clean, your cake is done.
- Cooling Time: Allow the cake layers to cool completely before frosting. This prevents the icing from melting and ensures a beautiful finish.
- Storage Tips: If you have leftover cake, store it in an airtight container at room temperature for up to three days. For longer storage, refrigerate or freeze the cake, wrapped tightly in plastic wrap.
By following these cooking notes, you’ll set yourself up for success in creating a delicious Old Fashioned Butter Cake with Chocolate Icing. Each step is designed to enhance the flavor and texture of your cake, ensuring that it’s a hit at any gathering. In the next section, we will discuss some serving suggestions to elevate your cake experience!
Serving Suggestions for Old Fashioned Butter Cake with Chocolate Icing
Once your Old Fashioned Butter Cake with Chocolate Icing is beautifully frosted and ready to go, it’s time to think about how to serve it. Presentation can elevate your dessert experience, making it even more enjoyable for you and your guests. Here are some delightful serving suggestions to consider:
- Classic Slices: Serve the cake in generous slices on individual dessert plates. This classic approach allows everyone to enjoy a piece of the moist cake paired with rich chocolate icing.
- With Fresh Berries: Add a handful of fresh berries, such as strawberries, raspberries, or blueberries, on the side of each slice. The tartness of the berries complements the sweetness of the cake beautifully.
- Whipped Cream: A dollop of freshly whipped cream on top of each slice adds a light and airy texture. You can sweeten the cream with a bit of sugar and vanilla for extra flavor.
- Ice Cream Delight: Serve warm slices of cake with a scoop of vanilla or chocolate ice cream. The combination of warm cake and cold ice cream is simply irresistible!
- Chocolate Drizzle: For an extra touch of indulgence, drizzle some melted chocolate over the top of the frosted cake. This adds a beautiful visual element and enhances the chocolate flavor.
- Garnish with Nuts: Sprinkle some chopped nuts, like pecans or walnuts, on top of the icing for added crunch and flavor. This also adds a nice contrast to the smooth icing.
- Layered Presentation: If you’re feeling creative, consider cutting the cake into smaller squares and layering them on a serving platter. Alternate layers of cake and icing for a stunning visual effect.
These serving suggestions not only enhance the presentation of your Old Fashioned Butter Cake with Chocolate Icing but also add complementary flavors and textures. Whether you’re hosting a special occasion or enjoying a quiet dessert at home, these ideas will make your cake experience even more delightful. In the next section, we will share some tips for perfecting your Old Fashioned Butter Cake with Chocolate Icing!
Tips for Perfecting Old Fashioned Butter Cake with Chocolate Icing
Creating the perfect Old Fashioned Butter Cake with Chocolate Icing is an art that can be mastered with a few helpful tips. Whether you’re a beginner or an experienced baker, these suggestions will ensure your cake turns out moist, flavorful, and visually appealing every time.
- Use Quality Ingredients: The quality of your ingredients can significantly impact the final product. Opt for high-quality butter, fresh eggs, and premium vanilla extract. These ingredients enhance the flavor and texture of your cake.
- Don’t Skip Sifting: Sifting your flour and dry ingredients is essential. It aerates the flour, helping to create a lighter cake. This step also removes any lumps, ensuring a smooth batter.
- Room Temperature Ingredients: As mentioned earlier, using room temperature ingredients is crucial. This allows for better mixing and helps the batter rise evenly, resulting in a fluffy cake.
- Be Mindful of Mixing: Mix the batter just until combined. Overmixing can lead to a dense cake. It’s okay if there are a few small lumps; they will bake out during cooking.
- Check Oven Temperature: Ovens can vary in temperature. Use an oven thermometer to ensure your oven is at the correct temperature. This will help prevent underbaking or overbaking your cake.
- Cool Completely: Allow your cake layers to cool completely before frosting. This prevents the icing from melting and ensures a clean, beautiful finish. Patience is key here!
- Experiment with Flavors: Don’t hesitate to try different extracts or add-ins. Almond extract, citrus zest, or even a splash of coffee can elevate the flavor profile of your cake.
- Store Properly: If you have leftovers, store the cake in an airtight container. This keeps it fresh and moist. You can also freeze the cake layers for later use, just make sure to wrap them tightly.
- Practice Makes Perfect: Baking is a skill that improves with practice. Don’t be discouraged if your first attempt isn’t perfect. Learn from each experience, and soon you’ll be creating cakes like a pro!
By following these tips, you’ll be well on your way to mastering the Old Fashioned Butter Cake with Chocolate Icing. Each step is designed to enhance the overall quality of your cake, making it a delightful treat for any occasion. In the next section, we will break down the time needed for each step of this delicious recipe.
Breakdown of Time for Old Fashioned Butter Cake with Chocolate Icing
Prep Time
Preparing the Old Fashioned Butter Cake with Chocolate Icing is a delightful process that takes about 20 minutes. During this time, you will gather all your ingredients, preheat the oven, and mix the batter. It’s a great opportunity to enjoy the aromas of baking as you combine the ingredients. Make sure to take your time to measure everything accurately for the best results!
Cooking Time
The cooking time for this cake is approximately 28 minutes. This is when the magic happens! As the cake bakes, your kitchen will fill with the wonderful scent of butter and vanilla. Keep an eye on the cake during the last few minutes of baking. Remember to check for doneness by inserting a toothpick into the center. If it comes out clean, your cake is ready!
Total Time
In total, you can expect to spend about 1 hour from start to finish. This includes both the prep and cooking time. After baking, allow the cake to cool for about 10 minutes in the pans before transferring it to a cooling rack. Once cooled, you can frost it with the rich chocolate icing. The entire process is not only quick but also incredibly rewarding!
With this breakdown of time, you can plan your baking session effectively. Whether you’re making this cake for a special occasion or just to enjoy at home, knowing how long each step takes will help you manage your time better. Now that you have a clear understanding of the time involved, let’s move on to the nutritional information for this delicious cake!
Nutritional Information for Old Fashioned Butter Cake with Chocolate Icing
Calories and Macronutrients
Understanding the nutritional content of your Old Fashioned Butter Cake with Chocolate Icing can help you enjoy it mindfully. Each slice of this delightful cake offers a balance of flavors and nutrients. Here’s a breakdown of the calories and macronutrients per serving:
| Nutrient | Amount per Serving (1 slice) |
|---|---|
| Calories | 320 kcal |
| Total Fat | 15 g |
| Saturated Fat | 9 g |
| Cholesterol | 80 mg |
| Sodium | 200 mg |
| Total Carbohydrates | 45 g |
| Dietary Fiber | 1 g |
| Total Sugars | 30 g |
| Protein | 4 g |
This cake is rich in flavor, thanks to the butter and sugar, which contribute to its delightful taste. While it’s a treat, it’s also important to enjoy it in moderation. The combination of carbohydrates and fats makes it a satisfying dessert, perfect for special occasions or a sweet indulgence after a meal.
For those who are health-conscious, consider pairing a slice with fresh fruit or a dollop of whipped cream to add a refreshing element. This can balance the richness of the cake while providing additional nutrients. Now that you have a clear understanding of the nutritional information, let’s move on to some frequently asked questions about the Old Fashioned Butter Cake with Chocolate Icing!
FAQs about Old Fashioned Butter Cake with Chocolate Icing
What is the best way to store Old Fashioned Butter Cake with Chocolate Icing?
Storing your Old Fashioned Butter Cake with Chocolate Icing properly is key to keeping it fresh and delicious. If you have leftover cake, place it in an airtight container at room temperature. This will help maintain its moisture and flavor for up to three days. If you want to keep it longer, consider refrigerating it. Just make sure to wrap it tightly in plastic wrap to prevent it from drying out. For even longer storage, you can freeze the cake. Wrap each layer in plastic wrap and then in aluminum foil. This way, it can last for up to three months in the freezer. When you’re ready to enjoy it, simply thaw it in the refrigerator overnight.
Can I make Old Fashioned Butter Cake with Chocolate Icing ahead of time?
Absolutely! Making the Old Fashioned Butter Cake with Chocolate Icing ahead of time is a great idea, especially for special occasions. You can bake the cake layers a day or two in advance. Just cool them completely, wrap them in plastic wrap, and store them in the refrigerator. When you’re ready to serve, frost the cake with the chocolate icing. If you prefer, you can also make the icing ahead of time. Store it in an airtight container in the refrigerator. Just remember to reheat it slightly before using, as it may thicken when chilled.
How can I make Old Fashioned Butter Cake with Chocolate Icing gluten-free?
To make a gluten-free version of the Old Fashioned Butter Cake with Chocolate Icing, you can substitute the all-purpose flour with a gluten-free flour blend. Look for a blend that includes xanthan gum, as this helps mimic the texture of traditional flour. Additionally, ensure that all other ingredients, like baking powder and chocolate, are gluten-free. Follow the same recipe instructions, and you’ll have a delicious gluten-free cake that everyone can enjoy!
What are some common mistakes to avoid when making Old Fashioned Butter Cake with Chocolate Icing?
When baking the Old Fashioned Butter Cake with Chocolate Icing, there are a few common mistakes to watch out for:
- Not Preheating the Oven: Always preheat your oven before baking. This ensures even cooking and helps the cake rise properly.
- Using Cold Ingredients: Make sure your butter, eggs, and milk are at room temperature. Cold ingredients can lead to a dense cake.
- Overmixing the Batter: Mix just until combined. Overmixing can make the cake tough instead of light and fluffy.
- Skipping the Cooling Step: Allow the cake layers to cool completely before frosting. Frosting a warm cake can cause the icing to melt.
- Not Checking for Doneness: Always check your cake a few minutes before the suggested baking time. Ovens can vary, and you want to avoid overbaking.
By avoiding these common pitfalls, you’ll be well on your way to creating a perfect Old Fashioned Butter Cake with Chocolate Icing that everyone will love!
Conclusion: Enjoying Old Fashioned Butter Cake with Chocolate Icing
As we wrap up our delightful journey through the world of Old Fashioned Butter Cake with Chocolate Icing, it’s clear that this classic dessert holds a special place in the hearts of many. The combination of a moist, buttery cake paired with rich, creamy chocolate icing creates a treat that is not only delicious but also nostalgic. Whether you’re celebrating a special occasion or simply indulging in a sweet moment, this cake is sure to bring joy to your table.
One of the best parts about baking this cake is the opportunity to share it with loved ones. Imagine the smiles on their faces as they take their first bite, savoring the flavors and textures that come together so beautifully. Baking can be a wonderful way to connect with family and friends, creating memories that last a lifetime. So, gather your loved ones, roll up your sleeves, and enjoy the process of making this delightful cake together.
Remember, the beauty of the Old Fashioned Butter Cake with Chocolate Icing lies in its versatility. Feel free to experiment with different flavors, add-ins, and serving suggestions to make it your own. Whether you choose to stick with the classic recipe or try out some variations, each version is bound to be a hit.
As you take your first slice, don’t forget to appreciate the effort and love that went into creating this masterpiece. Each bite is a reminder of the joy that baking can bring. So, go ahead, indulge in a slice (or two) of this scrumptious cake, and share it with those you cherish. Here’s to many more baking adventures and sweet moments ahead!