Introduction to Peanut Butter & Jelly Cheesecake
The Perfect Dessert for Any Occasion
When it comes to desserts, few combinations are as beloved as peanut butter and jelly. This classic duo brings back memories of childhood lunches and carefree days. Now, imagine transforming that nostalgic flavor into a rich, creamy cheesecake. The Peanut Butter & Jelly Cheesecake is not just a dessert; it’s an experience that delights the senses. Whether you’re celebrating a birthday, hosting a family gathering, or simply treating yourself, this cheesecake is sure to impress.
Its creamy texture and sweet, nutty flavor make it a crowd-pleaser. Plus, it’s easy to make! With just a few simple ingredients, you can create a dessert that looks and tastes like it came from a fancy bakery. The combination of the crunchy graham cracker crust, the smooth peanut butter filling, and the vibrant jelly swirl creates a beautiful presentation. This dessert is perfect for any occasion, from casual get-togethers to elegant dinner parties.
Why Peanut Butter & Jelly Cheesecake Stands Out
What sets Peanut Butter & Jelly Cheesecake apart from other desserts? First, it’s the unique blend of flavors. The rich, creamy peanut butter filling pairs perfectly with the sweet and fruity jelly. This delightful contrast makes each bite a taste sensation. Additionally, the cheesecake is versatile. You can use different flavors of jelly, such as strawberry, grape, or raspberry, to suit your taste. This flexibility allows you to customize the dessert for any event.
Moreover, the cheesecake is visually stunning. The swirls of jelly create a beautiful marbled effect, making it a showstopper on any dessert table. It’s not just about taste; it’s about presentation too! Finally, this cheesecake is a great way to introduce new flavors to your friends and family. They’ll be amazed at how a simple childhood favorite can be transformed into a sophisticated dessert. So, get ready to impress your guests with this delightful Peanut Butter & Jelly Cheesecake!
Ingredients for Peanut Butter & Jelly Cheesecake
Essential Ingredients for the Crust
The crust is the foundation of any cheesecake, and for our Peanut Butter & Jelly Cheesecake, we use a simple yet delicious graham cracker crust. To make this crust, you will need:
- 2 cups graham cracker crumbs
- 1/2 cup unsalted butter, melted
- 1/4 cup granulated sugar
These ingredients come together to create a crunchy base that perfectly complements the creamy filling. The sweetness from the sugar balances the buttery flavor, making each bite delightful.
Key Components of the Peanut Butter Cheesecake Filling
The filling is where the magic happens! This creamy peanut butter cheesecake filling is rich and satisfying. Here’s what you’ll need:
- 3 packages (8 oz each) of cream cheese, softened
- 1 cup creamy peanut butter
- 1 cup granulated sugar
- 3 large eggs
- 1/2 cup sour cream
- 1 tsp vanilla extract
Each ingredient plays a vital role. The cream cheese provides a smooth texture, while the peanut butter adds that beloved nutty flavor. The eggs help bind everything together, and the sour cream adds a touch of tanginess that balances the sweetness.
Jelly Swirl Ingredients
The jelly swirl is what makes this cheesecake truly special. It adds a burst of fruity flavor and a pop of color. For the jelly swirl, you will need:
- 1/2 cup strawberry or grape jelly
- 2 tbsp warm water
Mixing the jelly with warm water helps to thin it out, making it easier to swirl into the cheesecake filling. You can choose your favorite jelly flavor to customize the taste!
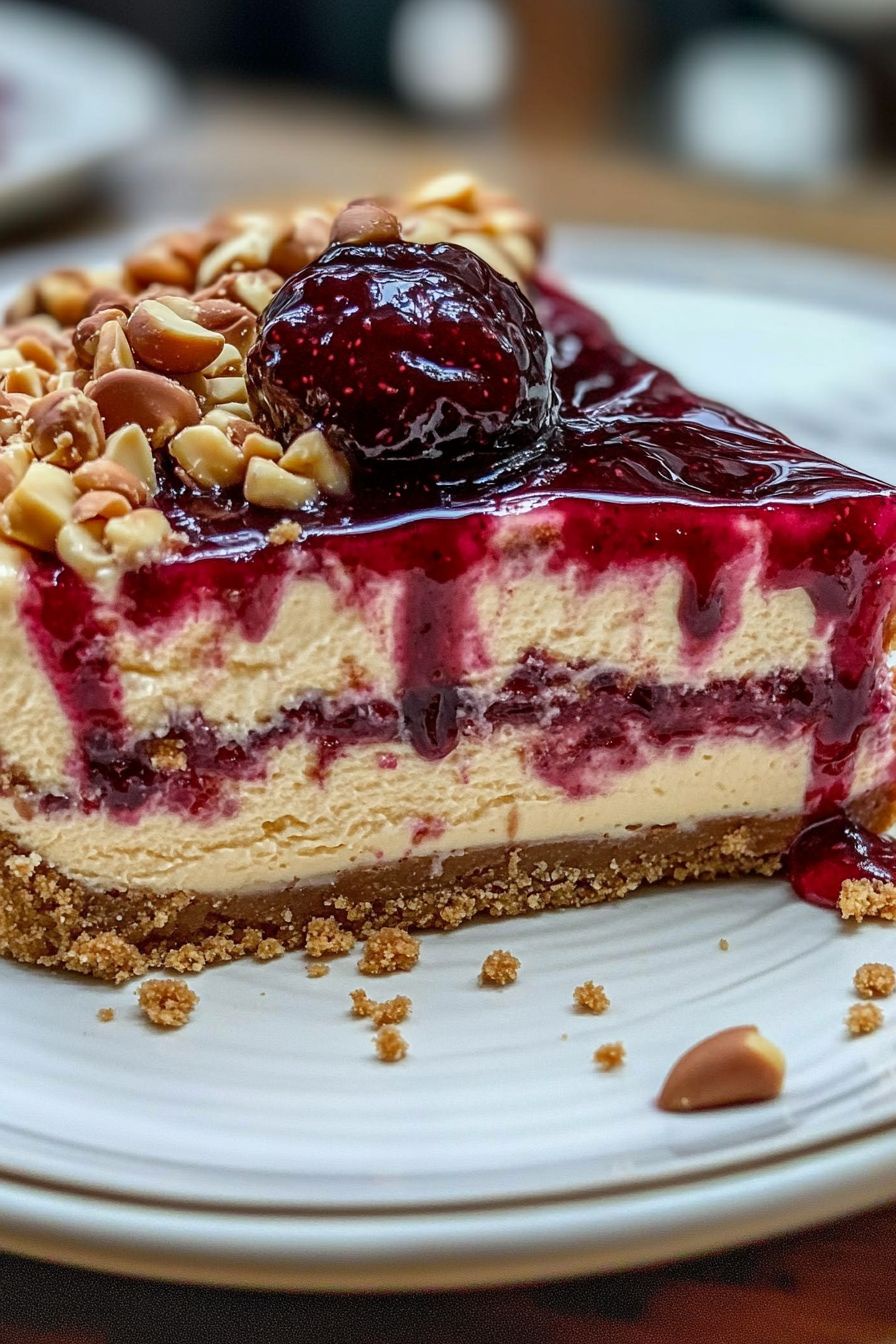
Optional Toppings for Extra Flavor
To elevate your Peanut Butter & Jelly Cheesecake, consider adding some optional toppings. These can enhance both the flavor and presentation:
- 1/4 cup peanut butter, melted
- 1/4 cup jelly, melted
- Crushed peanuts for garnish
Drizzling melted peanut butter and jelly on top adds a delicious finishing touch. The crushed peanuts provide a nice crunch, making each slice even more enjoyable.
Step-by-Step Preparation of Peanut Butter & Jelly Cheesecake
Step 1: Prepare the Crust
Preheating the Oven
Start by preheating your oven to 325°F (165°C). This step is crucial as it ensures that your cheesecake bakes evenly. While the oven heats up, you can prepare the crust.
Mixing the Crust Ingredients
In a medium-sized bowl, combine 2 cups of graham cracker crumbs, 1/2 cup of melted unsalted butter, and 1/4 cup of granulated sugar. Use a fork or your hands to mix everything together until the crumbs are well-coated with butter. The mixture should resemble wet sand.
Baking the Crust
Next, press the crumb mixture firmly into the bottom of a greased 9-inch springform pan. Make sure it’s even and compact. Bake the crust in the preheated oven for about 10 minutes. Once done, remove it from the oven and let it cool completely before adding the cheesecake filling.
Step 2: Make the Cheesecake Filling
Beating the Cream Cheese and Peanut Butter
In a large mixing bowl, beat together 3 packages of softened cream cheese and 1 cup of creamy peanut butter. Use an electric mixer on medium speed until the mixture is smooth and creamy. This step is essential for a velvety texture.
Incorporating Eggs and Other Ingredients
Next, add 1 cup of granulated sugar to the mixture. Beat well until combined. Then, add 3 large eggs, one at a time, mixing thoroughly after each addition. Finally, stir in 1/2 cup of sour cream and 1 teaspoon of vanilla extract. Mix until everything is well incorporated.
Pouring the Filling Over the Crust
Once your filling is ready, pour it over the cooled graham cracker crust. Use a spatula to spread it evenly. This will create a smooth base for the jelly swirl.
Step 3: Add the Jelly Swirl
Preparing the Jelly Mixture
In a small bowl, mix 1/2 cup of your choice of jelly (strawberry or grape) with 2 tablespoons of warm water. Stir until the jelly is smooth and slightly thinned out. This will make it easier to swirl into the cheesecake.
Swirling the Jelly into the Cheesecake
Drop small spoonfuls of the jelly mixture over the cheesecake batter. Then, take a toothpick or a skewer and gently swirl the jelly into the filling. Be careful not to overmix; you want to create a beautiful marbled effect!
Step 4: Bake & Cool the Cheesecake
Baking Time and Temperature
Place the cheesecake in the oven and bake for 50-55 minutes. The center should be slightly jiggly when you take it out. This indicates that it’s perfectly baked.
Cooling Process in the Oven
After baking, turn off the oven and crack the door open. Let the cheesecake cool in the oven for about 1 hour. This gradual cooling helps prevent cracks on the surface.
Refrigeration for Perfect Texture
Once cooled, transfer the cheesecake to the refrigerator. Chill it for at least 4 hours, or preferably overnight. This step is vital for achieving the best texture and flavor.
Step 5: Assemble & Serve the Cheesecake
Drizzling Toppings
Before serving, melt 1/4 cup of peanut butter and 1/4 cup of jelly in separate bowls. Drizzle these melted toppings over the chilled cheesecake for an extra layer of flavor.
Garnishing with Crushed Peanuts
For a delightful crunch, sprinkle crushed peanuts on top. This adds a nice texture contrast and enhances the peanut butter flavor. Now, slice your cheesecake and enjoy this delicious treat!
Variation of Peanut Butter & Jelly Cheesecake
Alternative Flavors and Ingredients
While the classic peanut butter and jelly flavor is a hit, you can easily switch things up! Consider using different nut butters, like almond or cashew, for a unique twist. You can also experiment with various jelly flavors. Raspberry, blackberry, or even orange marmalade can add a delightful surprise to your cheesecake. For a chocolatey version, mix in some cocoa powder into the filling or use chocolate graham crackers for the crust. The possibilities are endless, allowing you to create a cheesecake that suits your taste buds perfectly!
Gluten-Free Options for the Crust
If you or your guests are gluten-sensitive, you can still enjoy this delicious cheesecake! Simply substitute the graham cracker crumbs with gluten-free alternatives. Look for gluten-free graham cracker crumbs or use crushed gluten-free cookies, like almond or coconut cookies. Combine them with melted butter and sugar just like in the original recipe. This way, you can savor the same delightful flavors without worrying about gluten!
Vegan Adaptations for the Cheesecake
For those following a vegan diet, you can make this cheesecake without any animal products. Start by replacing cream cheese with a vegan cream cheese alternative. You can also use natural peanut butter and a plant-based yogurt instead of sour cream. For the eggs, consider using flaxseed meal or chia seeds mixed with water as a binding agent. This will help achieve a similar texture while keeping the cheesecake completely plant-based. With these substitutions, everyone can enjoy a slice of this delightful dessert!
Cooking Note for Peanut Butter & Jelly Cheesecake
Tips for Achieving the Best Texture
Getting the perfect texture for your Peanut Butter & Jelly Cheesecake is essential for a delightful experience. Here are some tips to help you achieve that creamy, smooth consistency:
- Use Room Temperature Ingredients: Make sure your cream cheese and eggs are at room temperature before mixing. This helps them blend smoothly without lumps.
- Don’t Overmix: While mixing, be careful not to overbeat the batter. Overmixing can introduce too much air, leading to cracks during baking.
- Water Bath Method: For an even creamier texture, consider using a water bath. Wrap the springform pan in aluminum foil and place it in a larger pan filled with hot water. This helps regulate the temperature and prevents cracks.
- Cool Gradually: Allow the cheesecake to cool slowly in the oven after baking. This gradual cooling helps prevent sudden temperature changes that can cause cracks.
- Chill Overnight: For the best flavor and texture, let your cheesecake chill overnight. This allows the flavors to meld and the texture to set perfectly.
Common Mistakes to Avoid
Even the best bakers can make mistakes! Here are some common pitfalls to watch out for when making your Peanut Butter & Jelly Cheesecake:
- Skipping the Cooling Step: Don’t rush the cooling process. Allowing the cheesecake to cool in the oven helps prevent cracks and ensures a smooth surface.
- Using Cold Ingredients: Cold cream cheese or eggs can lead to a lumpy batter. Always let them sit out for a bit before you start mixing.
- Not Greasing the Pan: Forgetting to grease the springform pan can make it difficult to remove the cheesecake later. Always grease it well to ensure easy release.
- Overbaking: Keep an eye on your cheesecake while it bakes. Overbaking can lead to a dry texture. The center should be slightly jiggly when you take it out.
- Skipping the Jelly Swirl: The jelly swirl is what makes this cheesecake special! Don’t skip this step; it adds flavor and visual appeal.
Serving Suggestions for Peanut Butter & Jelly Cheesecake
Pairing with Beverages
When it comes to enjoying your Peanut Butter & Jelly Cheesecake, the right beverage can enhance the experience. Here are some delightful pairings:
- Coffee: A warm cup of coffee complements the rich flavors of the cheesecake beautifully. The bitterness of the coffee balances the sweetness, making each bite even more enjoyable.
- Milk: For a classic pairing, serve your cheesecake with a glass of cold milk. The creamy texture of the milk pairs perfectly with the cheesecake, creating a nostalgic experience.
- Tea: Herbal teas, like chamomile or peppermint, can provide a refreshing contrast to the rich cheesecake. The lightness of the tea helps cleanse the palate between bites.
- Fruit Juices: Fresh fruit juices, such as orange or apple juice, add a fruity note that complements the jelly swirl. The acidity in the juice can cut through the creaminess of the cheesecake.
Experiment with different beverages to find your favorite combination. Each drink can bring out unique flavors in the cheesecake, making your dessert experience even more enjoyable!
Presentation Ideas for Special Occasions
Presentation is key when serving your Peanut Butter & Jelly Cheesecake, especially for special occasions. Here are some creative ideas to make your dessert stand out:
- Elegant Cake Stand: Serve your cheesecake on a beautiful cake stand. This elevates the dessert and makes it the centerpiece of your table.
- Garnish with Fresh Fruit: Add fresh strawberries or raspberries around the cheesecake for a pop of color. This not only enhances the visual appeal but also adds a fresh flavor.
- Decorative Plates: Use decorative plates or platters to serve individual slices. This adds a touch of elegance and makes each serving feel special.
- Whipped Cream Accents: Top each slice with a dollop of whipped cream. You can even pipe it into fun shapes for a festive touch.
- Personalized Touch: For birthdays or celebrations, consider adding a small cake topper or a sprinkle of edible glitter to make the cheesecake feel even more festive.
With these presentation ideas, your Peanut Butter & Jelly Cheesecake will not only taste amazing but also look stunning on any dessert table!
Tips for Making the Perfect Peanut Butter & Jelly Cheesecake
Ingredient Substitutions
Sometimes, you may not have all the ingredients on hand. No worries! Here are some easy substitutions to keep your cheesecake delicious:
- Peanut Butter: If you prefer a different nut butter, almond or cashew butter works well. Just ensure it’s creamy for the best texture.
- Sour Cream: You can replace sour cream with Greek yogurt. It adds a similar tanginess and keeps the cheesecake creamy.
- Granulated Sugar: For a healthier option, consider using honey or maple syrup. Just reduce the amount slightly, as these sweeteners are sweeter than sugar.
- Jelly: Feel free to use fruit preserves or even homemade fruit compote for a fresher taste. This can add a unique twist to your cheesecake.
- Eggs: If you need an egg substitute, use 1/4 cup of unsweetened applesauce for each egg. This keeps the cheesecake moist and adds a hint of sweetness.
These substitutions can help you create a cheesecake that fits your dietary needs while still being delicious!
Storage Tips for Leftovers
After enjoying your Peanut Butter & Jelly Cheesecake, you might have some leftovers. Here’s how to store them properly:
- Refrigeration: Cover the cheesecake with plastic wrap or aluminum foil. It can be stored in the refrigerator for up to 5 days. This keeps it fresh and tasty.
- Freezing: If you want to save it for later, you can freeze the cheesecake. Wrap it tightly in plastic wrap and then in aluminum foil. It can last in the freezer for up to 2 months.
- Thawing: To enjoy frozen cheesecake, transfer it to the refrigerator for several hours or overnight to thaw. This helps maintain its creamy texture.
By following these storage tips, you can savor your cheesecake for days to come!
Reheating Instructions
If you prefer your cheesecake slightly warm, reheating is simple. Here’s how to do it without compromising the texture:
- Microwave: Place a slice of cheesecake on a microwave-safe plate. Heat it in the microwave for about 10-15 seconds. Check to see if it’s warm enough; if not, heat in additional 5-second intervals.
- Oven: Preheat your oven to 300°F (150°C). Place the cheesecake on a baking sheet and cover it loosely with aluminum foil. Heat for about 10-15 minutes, or until warmed through.
Reheating your cheesecake can bring out the flavors and make it feel like a fresh dessert again!
Breakdown of Time for Peanut Butter & Jelly Cheesecake
Prep Time
Preparing your Peanut Butter & Jelly Cheesecake is a breeze! The prep time for this delightful dessert is approximately 15 minutes. During this time, you will gather all your ingredients, mix the crust, and prepare the cheesecake filling. It’s a quick and easy process that sets the stage for a delicious treat!
Cooking Time
The cooking time for the cheesecake itself is about 55 minutes. This includes baking the cheesecake until it’s perfectly set. Remember, the center should still be slightly jiggly when you take it out of the oven. This ensures a creamy texture that everyone will love!
Chill Time
Chill time is crucial for achieving the best flavor and texture. After baking, you’ll need to refrigerate the cheesecake for at least 4 hours, but overnight is even better. This allows the flavors to meld beautifully and gives the cheesecake time to set properly.
Total Time
In total, you’re looking at about 5 hours and 10 minutes from start to finish. This includes prep time, cooking time, and chill time. While it may seem like a long process, most of that time is hands-off, allowing you to relax while your cheesecake comes together. The end result is a stunning dessert that’s well worth the wait!
Nutritional Information for Peanut Butter & Jelly Cheesecake
Calories and Macronutrients
Understanding the nutritional content of your Peanut Butter & Jelly Cheesecake can help you enjoy it mindfully. Here’s a general breakdown of the calories and macronutrients per slice (assuming the cheesecake serves 10 slices):
- Calories: Approximately 350-400 calories per slice
- Protein: 8-10 grams
- Carbohydrates: 30-35 grams
- Fat: 25-30 grams
- Sugar: 15-20 grams
These values can vary based on the specific ingredients used and portion sizes. For instance, using low-fat cream cheese or sugar substitutes can reduce the calorie count. Always check the labels of your ingredients for the most accurate information.
Health Considerations
While Peanut Butter & Jelly Cheesecake is a delightful treat, it’s important to consider its nutritional aspects. Here are a few health considerations to keep in mind:
- Moderation is Key: Due to its rich ingredients, enjoy this cheesecake in moderation. A small slice can satisfy your sweet tooth without overindulging.
- Protein Source: The cheesecake contains protein from the cream cheese and eggs, which can help keep you feeling full longer.
- Healthy Fats: Peanut butter provides healthy fats, which are beneficial in moderation. However, be mindful of portion sizes, as fats are calorie-dense.
- Allergies: This dessert contains common allergens like peanuts and dairy. If you or your guests have allergies, consider alternative ingredients or variations.
- Balance with Nutrition: Pairing a slice of cheesecake with fresh fruit or a light salad can create a more balanced meal. This way, you can enjoy your dessert while still incorporating healthy options.
By being aware of these nutritional aspects, you can enjoy your Peanut Butter & Jelly Cheesecake as a delightful treat while maintaining a balanced diet.
FAQs about Peanut Butter & Jelly Cheesecake
Can I use natural peanut butter for this recipe?
Yes, you can use natural peanut butter in this recipe! However, keep in mind that natural peanut butter tends to be a bit runnier than regular creamy peanut butter. This may slightly alter the texture of your cheesecake. If you prefer a thicker consistency, you might want to stir the natural peanut butter well before using it. This will help incorporate the oils and create a smoother filling.
How long can I store the cheesecake in the fridge?
Your Peanut Butter & Jelly Cheesecake can be stored in the refrigerator for up to 5 days. Make sure to cover it tightly with plastic wrap or aluminum foil to keep it fresh. If you notice any condensation, it’s best to remove the cover briefly to let it air out. This will help maintain its creamy texture and delicious flavor.
Can I freeze Peanut Butter & Jelly Cheesecake?
Absolutely! Freezing your cheesecake is a great way to enjoy it later. Wrap the cheesecake tightly in plastic wrap and then in aluminum foil to prevent freezer burn. It can be stored in the freezer for up to 2 months. When you’re ready to enjoy it, simply transfer it to the refrigerator to thaw overnight. This will help preserve its creamy texture and flavor.
What can I substitute for cream cheese?
If you’re looking for a substitute for cream cheese, there are several options available. For a dairy-free alternative, you can use vegan cream cheese, which works well in this recipe. Another option is to use silken tofu blended until smooth. This will give you a similar texture while keeping it plant-based. Additionally, you can try using Greek yogurt for a tangy flavor, but be aware that it may alter the overall taste slightly.
Conclusion
Recap of the Delightful Experience
In conclusion, the Peanut Butter & Jelly Cheesecake is a delightful dessert that combines the nostalgic flavors of childhood with the elegance of a classic cheesecake. Its creamy peanut butter filling, vibrant jelly swirl, and crunchy graham cracker crust create a harmonious blend of textures and tastes. Each bite is a celebration of sweet and savory, making it a perfect treat for any occasion. Whether you’re serving it at a birthday party, a family gathering, or simply enjoying a slice at home, this cheesecake is sure to impress everyone.
Encouragement to Try the Recipe
We encourage you to try making this Peanut Butter & Jelly Cheesecake yourself! With simple ingredients and easy-to-follow steps, you’ll find that creating this delicious dessert is both fun and rewarding. Don’t be afraid to experiment with different flavors or toppings to make it your own. Remember, baking is all about creativity and enjoyment. So gather your ingredients, roll up your sleeves, and get ready to indulge in a slice of this delightful cheesecake. Your taste buds will thank you!